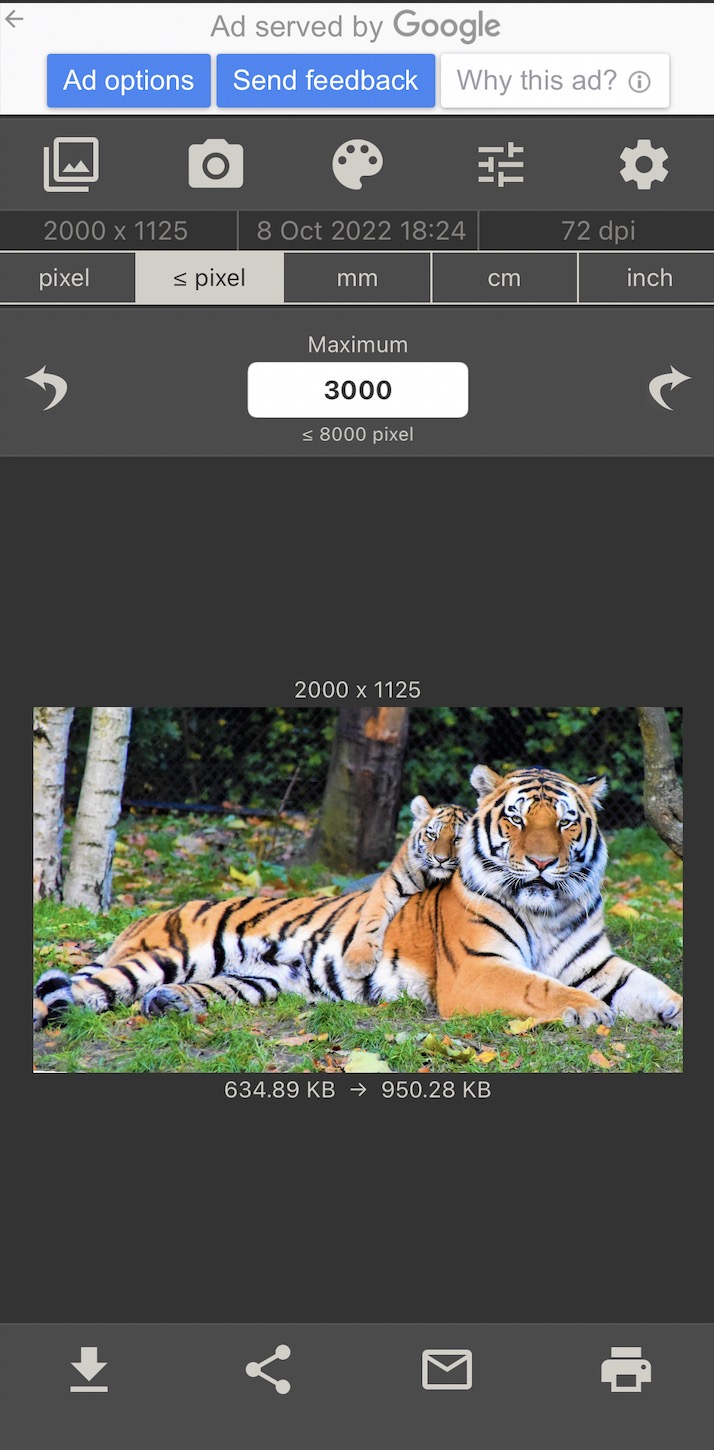
We’ve gone a long way over the past 10 years. The iPhone 6 was equipped with a 8 megapixel camera. Back to 2022, iPhone 14 Pro boasts a 48 megapixel camera. Unless you’re a professional photographer, you no longer need a separate camera to snap beautiful shots. Yet, this comes at a cost. Photos used to take 1 to 2MB of space on iPhone 5. On an iPhone 14 Pro, a photo could very well take 80 MB of storage space on iPhone 14.

We won’t complain about the drastic improvement in photo quality. Yet nobody likes to run out of storage space. And with the increasing image size, this can happen quicker than one may think. Similarly, if you’re manipulating stock photo images on your iPhone – which are usually very large on popular free stock images sites – you’ll probably need to reduce their size.
In this article, we’ll show you ways to resize your photos on iPhone. We’ll explore 2 approaches to reduce the size of your iPhone pictures:
- Using one of 3 built-in features of your iPhone (no need to download any app)
- Using free third-party iOS apps
That’s a grand total of 4 methods for which we’ll explore all pros and cons. Let’s get started!
Most of the methods described in this article also work if you’re trying to resize pictures on your iPad. We’ve reviewed how to change the size of images on a Mac in another blog post, and how to resize images on Windows.
How to Resize a Photo on an iPhone Without Any Third Party App
There are two approaches to resizing a photo on an iPhone without using an app. The first one consists in cropping an image to make it smaller. The second one consists in resizing an image without cropping it. Both can be done natively on an iPhone, without downloading a third-party app.
1. Reducing the size of a photo by cropping it
You can crop your photos using the iPhone’s native photo app. To do so, follow these steps:
Step 1: open your photo in the Photos app
Step 2: Tap edit button
Step 3: Tap Crop button at the bottom of the screen
Step 4: Tap Crop box button at the top of the screen
Step 5: Select an aspect ratio among the various options (more on that below)
Step 6: Select an orientation (Portrait or Landscape)
Step 7: Crop the photo
Step 8: Tap ‘Done’ button once you’re happy with the cropped photo

The iPhone’s Photo app gives a lot of flexibility with regards to the aspect ratio. This is great, as the aspect ratio is often considered more important that the image size.
Note that the aspect ratio can be either freeform or fixed:
- Freeform aspect ratio
- Fixed aspect ratio:
- Square
- 9:16
- 8:10
- 5:7
- 3:4
- 3:5
The freeform aspect ratio will allow you to choose any height and width for your picture. The fixed form aspect ratios will force the ratio between your picture’s height and width to be fixed.

Note that this method doesn’t free up space on your iPhone as the original image is still kept in the iPhone memory in case you changed your mind and wanted to reset the cropping.
In addition to resizing your images without any apps, you may also want to convert them to PDF format for better printing or sharing. Learn how in our guide on X Ways to Convert JPG to PDF Without Software
Pros & cons of using the Photos app on iPhone to resize photos
Pros of using the Photos app on iPhone to resize photos
|
Cons of using the Photos app on iPhone to resize photos
|
2. Reducing the size of a photo without cropping it
There are 2 easy ways to resize a photo without cropping it on iPhone. Both don’t require you to use any third-party apps as they rely on tools that are part of your iPhone’s default apps.
1. Resizing a photo using the Shortcuts app
This method is available only on iPhone and iPad with iOS 11 and its more recent updates.
One easy way to change the dimensions of your photos is to use the Shortcuts app. It allows you to create custom multi-steps automated tasks. The Shortcuts app is a default app on iOS devices. This means that you don’t need to install it.
Below is how you can resize images on your iPhone using the Shortcuts app. Note that 9 out of the 10 steps described below only need to be set up once. That’s why it deserves the name ‘Shortcuts’!

Step 1: find the Shortcuts app on your iPhone by searching for it, or
Step 2: tap on the Shortcuts app icon
Step 3: select an Action to be added as a shortcut. In our case we want to resize images so in order to find that predefined task, we search for ‘resize’ in the top search field.
Step 4: tap on the “Resize image” action
Step 5: tap on “Add action”
Step 6: specify the picture size you’d like to resize your original photos to, by either entering a width, an height or both. If you leave the height on “auto”, the aspect ratio of your original photo will be kept.
Step 7 (optional): you may add other actions if you want the Shortcuts app to do more. For example, you may program Shortcuts to crop your original images, rotate them or flip them. In this tutorial, we’ll focus on our core task which is to resize photos.
 |
By default, the images will be saved into the “recents” album on your iPhone. You may choose a different location by adding a “Save to Photos Album” task to your Shortcut. Then specify where you’d like the resized photos to be saved. |
Step 8: in the next step, you’ll be invited to enter a name for the app. Since this command can be called using Siri, make sure you can easily remember it!
Step 9: in order for the shortcut to be easily accessible in your Photos app, enable the feature Show in Share Sheet.
Step 10: Now your shortcut is ready to be used! Go to your Photos library on your iOS device, then tap the Share button. If you scroll down, you’ll be able to see the shortcut you’ve just created. From now onwards, all you need to do for any photo resize task, is to select one or multiple photos, tap the Share button and select Resize my Photos.
Pros & cons of using the Shortcuts app on iPhone to resize photos
Pros of using the Shortcuts app on iPhone to resize photos
|
Cons of using the Shortcuts app on iPhone to resize photos
|
2. Resizing a photo while sharing it via Mail or Messages
Want to share a photo via email or message? You don’t need to manually resize it. Your iPhone provides you with a convenient way to do so prior to sharing it. While this method doesn’t provide a ton of flexibility, it’s still a solid option to compress photos without cropping them.

Step 1: Select a photo to be shared in your iPhone’s camera roll or photo album
Step 2: Click on the Mail icon
Step 3: Upon sending the email to the recipient, you will be offered to “reduce the message size by scaling the image to one of [several] sizes”.
Mail will give you 4 options: small size, medium size, large size and actual size. All of them, apart from the last one, lead to a reduction of file size and resolution of the image.
Pros & cons of using the iOS Mail app to resize photos
Pros of using the iOS Mail app to resize photos
|
Cons of using the iOS Mail app to resize photos
|

Are you trying to reduce the size of a photo to share it via SMS? Your iPhone provides an easy way to do it. Here’s how to proceed:
Step 1: Go to Settings on your iPhone
Step 2: Go to Messages
Step 3: Enable “Low-Quality Image Mode”
Enabling the low-quality image mode will compress images sent via SMS. This method is fairly simple to use. It comes at the cost of lack of control on the size of the compressed image.
Pros & cons of using the iOS Message app to resize photos
Pros of using the iOS Message app to resize photos
|
Cons of using the iOS Message app to resize photos
|
If you need to resize photos for passports or other official documents, don’t miss our comprehensive guide on how to convert a picture to passport size
How to Resize a Photo on an iPhone Using Free Apps
Now that we’ve seen how to resize a photo on an iPhone without any third-party apps, you might think that it can do everything, right? After all, we’ve seen that your iPhone is very capable: it can resize photos, crop them, batch-resize them… it can even help you convert images to PDF without installing any app on your iPhone. Why in the world would you want to download a third-party app to achieve the same result? Well, if you want advanced functionalities, you’d save a lot more time by using a third-party iOS app designed for that purpose.
By “advanced functionalities” we’re referring to the ability to view and edit file size, image dimensions, aspect ratio, crop size, file format, and the ability to batch resize photos.
We’ve tested a number on iOS apps we downloaded from App Store. Below are the free apps – and freemium apps – that stood out.
1. Desqueeze

Desqueeze app allows you to easily batch resize your photos. It’s very intuitive to use. But in case you feel lost, you could go through the well-designed step-by-step app tour.
On top of a clean user interface, Desqueeze app provides a fairly large range of settings:
- File format
- Image dimensions
- Image orientation
- Aspect ratio (with an auto-fit feature)
- Image quality
Besides, it’s not just limited to photos. You can use it for videos.
2. Image Size
Image Size app is a popular app to resize images for free on iPhone. It has been rated more than 1.4k times, with an average review rating of 4.7 out of 5 at the time of writing. Let’s see why people seem to like it.
While the design and UX of Image Size is a bit dated compared to Desqueeze app, the app still does the job. In fact, it offers more functionalities than Desqueeze:
- File format (TIFF, JPEG, PNG)
- Image dimensions in several metric systems (pixels, mm, cms, inches)
- Image orientation
- Aspect ratio (but no auto-fit feature)
- Image quality
- Print functionality
- New file size calculator
- Color filters
- Share functionality
Unlike Desqueez however, you won’t be able to resize images in bulk. To do that, you’ll need to download another app called “Batch Resize”, developed by the same team.
This free app is monetized through ads. This may annoy some users as it’s not only distracting but it also reduces the available workspace. However, it’s not very intrusive as it’s placed in the header of the app. Besides, it does not slow you down like a video ads would. If that still bothers you, you may upgrade to the paid version of Image Size, which will cost you around $15 (one-off).
In a nutshell, if you’re looking for a large set of functionalities without batch functionality, this app is for you.
3. Photo Compress
Like Image Size, the free version of Photo Compress app is monetized via ads. You can get rid of them for $8. The app is a bit heavier on the ads than Image Size. You’ll have to watch interstitial video ads from time to time. This may not be for the most impatient among us.

Compared to the Image Size app, Photo Compress app offers fewer resize options. It’s also less user friendly. You may only specify the size and the quality of the output images, which may be fine if you’re looking for a quick way to resize your images for free.
On the pros side, this app allows you to resize your photos in bulk. It also allows you to do so for your videos.
4. ReSIZER
This app has fewer downloads than the aforementioned ones but it shouldn’t be ignored.
In terms of user flow, the ReSIZER app is simple to use and similar to Photo Compress:
- First select several images to batch resize
- Then picks image quality and image size settings
- Resize photos

However reSIZER offers 3 advantages compared to Photo Compress:
- The design is more modern
- It offers advanced options (although fewer than Image Size app)
- You won’t be distracted by ads
Our Verdict: The Best Free Apps to Resize Photos on iPhone
Desqueez and Image Size stood out from the competition, from a features, ease of use and interface.
| App name | Features | Ease of use | Interface | Overall |
| Desqueeze |  |
 |
|
 4.7/5 4.7/5 |
| Image Size | |
 |
|
 4.5/5 4.5/5 |
| Resizer |  |
|
|
 3.8/5 3.8/5 |
| Photo Compress |  |
|
|
 3.2/5 3.2/5 |
How to Batch Resize Photos on an iPhone?
There are 2 main ways to batch resize photos on an iPhone. The first one relies on iOS’s Shortcuts app and requires iOS 11+. The second one relies on external apps.
1. Bulk resizing your photos without any iPhone app
On iOS devices 11+, Apple’s built-in Shortcuts app provides a convenient way to batch resize multiple images at the same time without having to download any app. Once you’ve created the shortcut as we described earlier on:
Step 1: open your photos app and select the images you’d like to resize.
Step 2: Click on Share button.
Step 3: Select the shortcut you’ve previously created in the Shortcuts app to resize photos.

2. Resizing your iphone pictures with a free iPhone app
The following free iPhone apps allow you resize your images in bulk:
- Desqueeze app – our favorite for its ease of use and user interface
- Photo Compress apps
- reSIZER app
For more details about these apps, check out our detailed analysis in the previous section.
Frequently Asked Questions
1. Why would you need to resize a photo on an iPhone?
iPhone photo sizes are becoming bigger and bigger, due to higher quality cameras. On an iPhone 14 Pro, a ProRAW photo file could eat up to 75MB of your storage space.
“ProRAW photos on the wide lens at 1× can be saved at 12 or 48 MP. Night mode, flash, and macro photos will always be saved at 12 MP."
— Steve Moser (@SteveMoser) September 7, 2022
A ProRAW file will be approximately:
• 25 MB at 12 MP
• 75 MB at 48 MP
Even though iPhones now have large storage capacity, you’ll still want to reduce image sizes for the following reasons:
-
- Photos are too heavy to send by email
- Photos consume lots of bandwidth upon sharing on the internet
- It makes it really slow to share photos on social media
- Photo files rapidly eat up your available storage space
- You may need to crop images for esthetic reasons
2. How to view the size of a photo on an iPhone?
If you’re running out of space on your iPhone, you may want to check the sizes of your photos to see which ones are taking too much space. Perhaps you inadvertently downloaded a photo that was very resource-intensive, or you’ve used an app to take high-resolution screenshots on your phone.
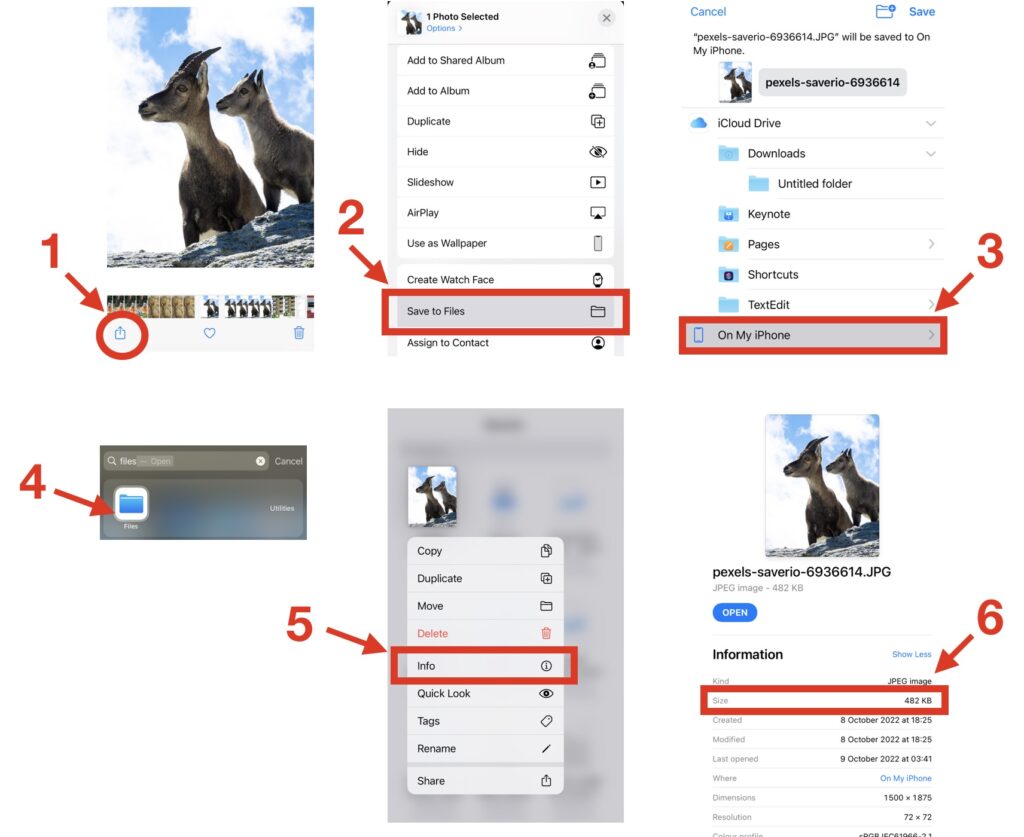
On iOS 14 and lower, the Photos app doesn’t show the image size natively. In order to see it, you’ll need to save the Photo in your Files folder as follows:
Step 1: go the Photos gallery app
Step 2: select the image you’d like to view the size of
Step 3: click on the share icon, then select “Save to Files” and pick a folder to save the photo to
Step 4: open your “Files folder” and long tap on the image thumbnail until a menu appears
Step 5: select “Info”
Step 6: you’ll be able to see the size of the image along many other relevant technical infos
Note that there are other ways to view the size of a photo on an iPhone, including a native way to do so easily on iOS 15 and later. We’ve covered them in another article.
3. Can you make a picture smaller on an iPhone without cropping it?
Yes you can. You can use one of the following methods to make your pictures smaller without resizing them:
- Use the shortcuts app which is available on Apple devices with iOS 11+
- Send the pictures via the Mail app or the Message app
- Use a free resize app you can find on the App store
We’ve reviewed these methods in detail in this section: how to reduce the size of an an iPhone without cropping it.
Conclusion
We’ve covered 4 main ways of resizing images on your iPhone. While resizing and compressing images on desktop is usually done through third-party web apps, resizing images on an iPhone can easily be done by relying on built-in features such as the Mail app, the Messages app and the Shortcuts app (on iOS 11+).
Now which method to choose depends on how much control you want on the final output.
- If you want a quick way to reduce an image size, the built-in features will certainly do the job. They will also be faster than other methods.
- For granularity on the output, such as file type, file size, image quality or aspect ratio, you’ll need to rely on third-party apps such as Desqueeze and Image Size.
Finally, we’ll mention an alternative way to reduce the size of an image file if it’s a PNG. If you don’t mind changing the format of your picture, you may choose to convert your PNG file to PDF on your iPhone, which typically leads to a dramatic reduction in file size.