So you have this huge image that seems to be taking too much space and you’d like to resize it.
Perhaps you downloaded it from one of top free stock photos sites, or you’ve taken a high-resolution screenshot for your blog, and now need to resize it.
No matter your situation, resizing images on a Mac is a lot easier than resizing images on an iPhone. Indeed, Mac users can resize images with built-in tools such as Preview, Pages, Mail and ColorSync.
If you’re resizing images on Windows, you still have access to inbuilt features, and some programs are available on both platforms.
In this article, we’re going to review all these methods and a few extra ones. We’ll also provide an overview of the pros and cons of each method. Finally, we’ll share best practices such as how to maintain image quality or how to batch resize images.
If you’d like to get a quick overview of all those methods and see which one is best for you, jump to the Conclusion section to view our comparison table.
Let’s get started.
1. How to Resize Images on MacBook Using Preview?
Step-by-step method to resize an image using Apple’s Preview on Mac
One of the easiest ways to resize images on Macbook without using Photoshop is to use the Preview app. It is conveniently installed on your Mac by default. Here is how it works.
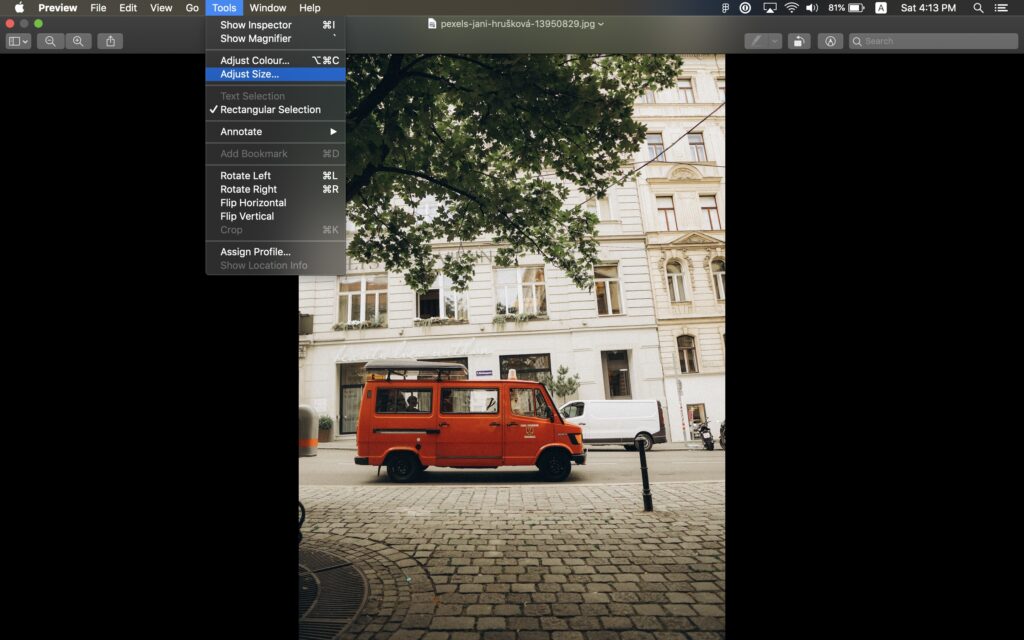
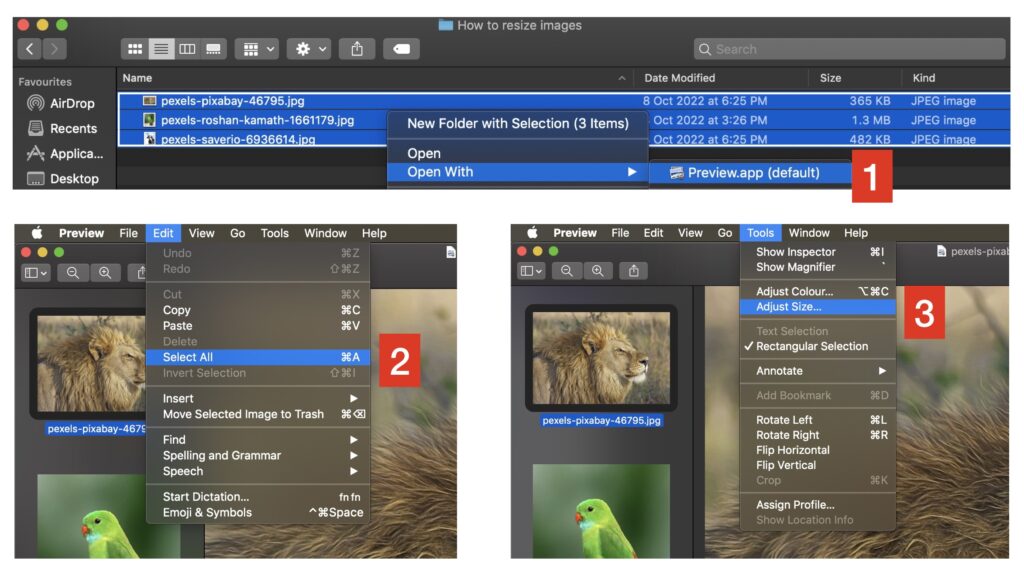
1. First, open the Finder app, and navigate to the image you want to resize. Select it and open it using the Preview app. In most cases, that should be the app by default, meaning that the image will automatically open using Preview. If that’s not the case, right-click on the selected image and go to Open With > Preview

2. In Preview, go to the Tools > Adjust Size… in the menu bar.
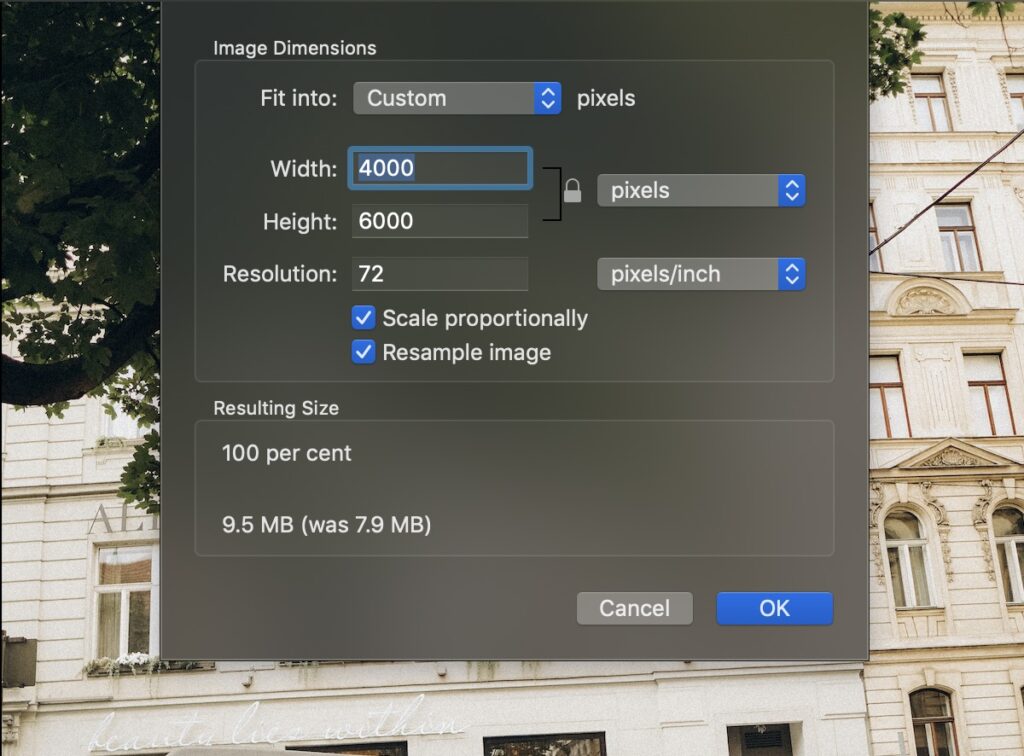
3. You’ll now see the image’s current size (in our example it’s 4000×6000 pixels). You can click on the drop down menu that currently shows “pixels” to show the image dimensions using other metrics (inches, centimeters, points, millimeters and percentages). You can either:
- Enter custom dimensions for the image, using the Width and Height fields. There are several additional options here; for now we’ll just explain what the “Scale proportionally” checkbox means. If that checkbox is checked, changing the width automatically changes the height so that the picture’s proportions stay the same. In the example below, the Height (6000 pixels) is 50% bigger than the Width (4000). If we decrease the Width to 1000 pixels, then Preview will automatically adjust the Height to 1500 pixels.
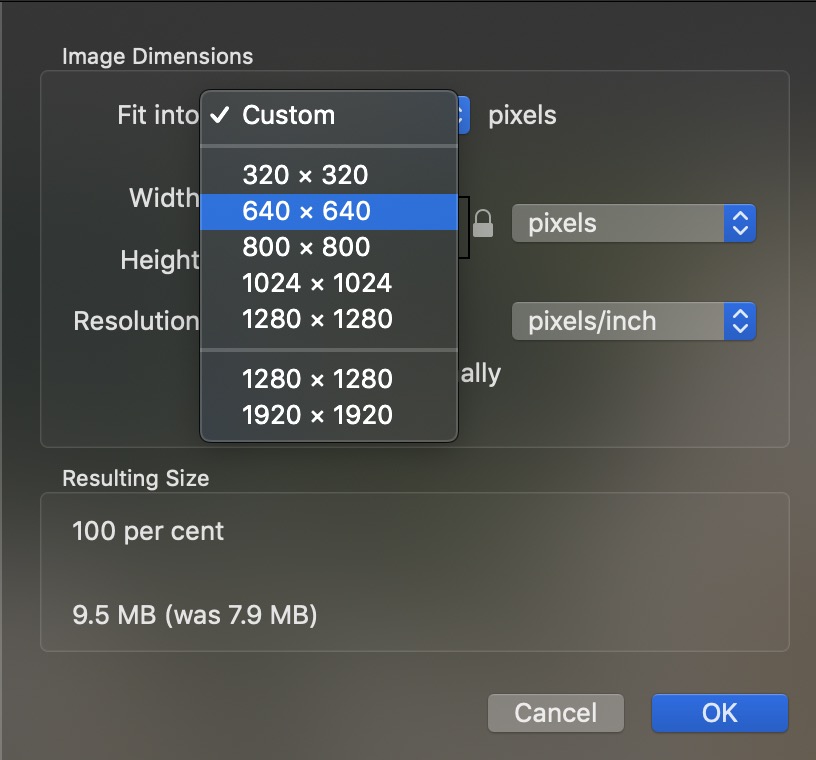
- Choose predefined dimensions from the “Fit into” drop-down menu. It shows standard dimensions in pixels such as 640×640, 800×800 and 1024×1024. Note that the dimensions that show up in the drop-down menu are for squared pictures (width is equal to weight). So what happens if you try to Fit a rectangle into a square? If the checkbox “Scale proportionally” is ticked, Preview will only consider the height of the predefined dimension and will scale the width to ensure the proportions of the resized image stay the same.
If you’re curious about the resample image feature in Preview, keep reading below.
How to resize multiple images at once on Mac with Preview?
The Preview app provides the best way to batch resize images on Mac. Instead of opening one file at a time like as we previously showed, you’ll need to start by selecting all the images you want to resize at once, then open them all on Preview at the same time.
This can be really useful if you are preparing a long-form article for which it’s often recommended to include an image every 150 to 350 words. If your article is 3000 words, that’s a total of 12 images that you’d need to resize to the recommended blog image size. Instead of resizing 12 images one after the other, you could resize them all at once.
Let’s see how to do this in Preview. Here’s the step-by-step process:
1. Click on your Mac’s Finder app and open the folder that contains all the images you want to resize at the same time, select all those image files by clicking on them while holding the Shift key. Once you have selected all the images you’d like to resize, right click and select Open With > Preview
2. Preview will now open and all the images you’ve previously selected should be visible in the left sidebar. If that’s not the case, select View > Thumbnails in the menu bar. Now, in order to resize those images in one shot, you’ll need to select them all by going to Edit > Select All in the menu bar.
3. Finally, open Tools > Adjust Size… and proceed to resizing those pictures using the same process as we described in previous paragraphs.
-
- To make it quick, use the first drop down menu (“Fit into”) to choose one of the default image sizes and click on “Ok” to resize your images to the selected dimensions (for ex: 640×640).
- Alternatively if you’d like to reduce the size of your images by 50%, you’d need to select per cent in the drop down menu next to Width and Height, and replace the default percentage (100%) by the the percentage value (50%) you’d like the final image to be reduced to.
- Finally, if you have precise dimensions you’d like your pictures to be resized to, you could enter specific values for the number of pixels, centimeters or millimeters of the final image.
One alternative to the first step is to open the Preview app first, then to File > Open… to select the image files you’d like to resize.
Pros
|
Cons
|
What does the Resample image option do in Preview?
What is resampling?
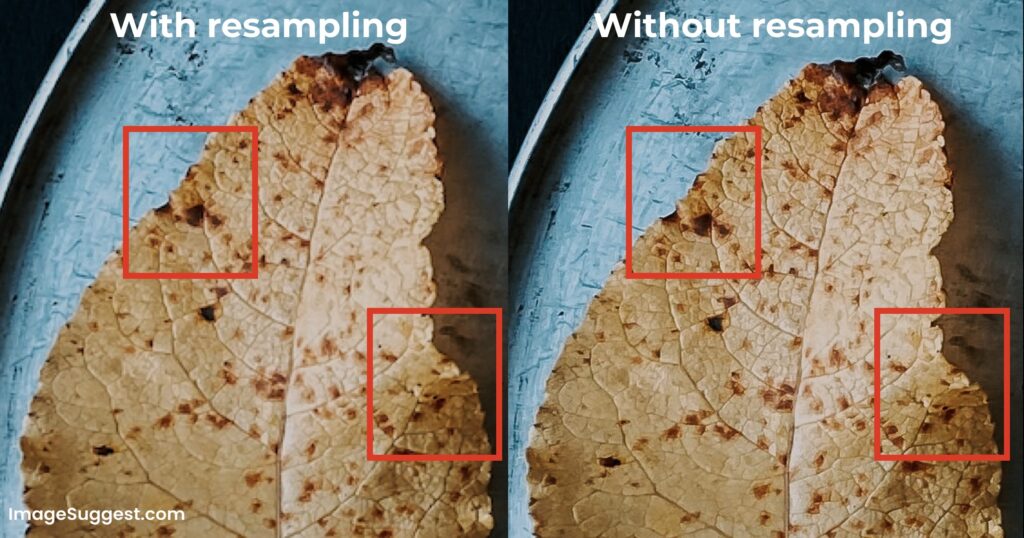
Resampling an image means changing the number of pixels in the image as you resize it. Let’s uncheck the box on the previous example to see how it works.
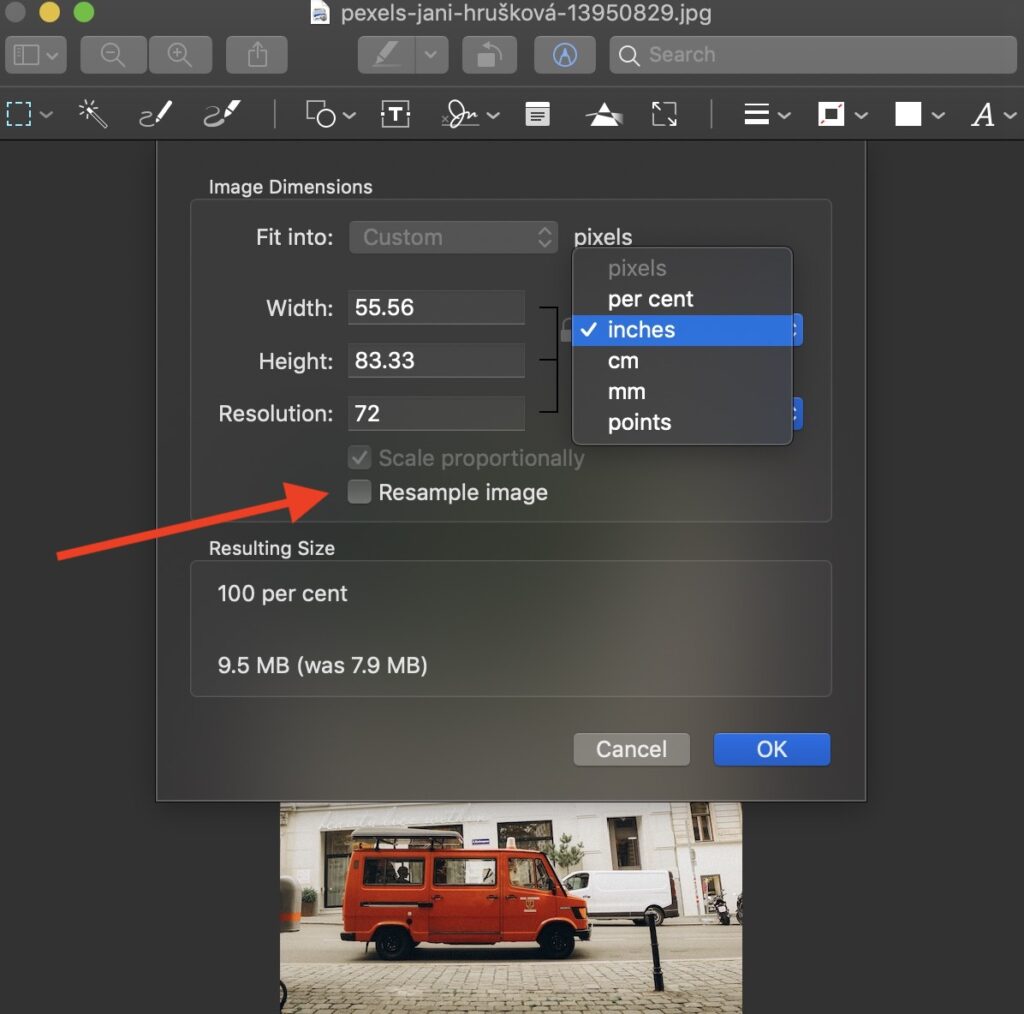
First you’ll notice that you can no longer resize the image according to Pixels. This is understandable because this option changes the number of pixels, which is exactly what we don’t want to do since we’ve unchecked the option to resample images.
Let’s resize the image from the current 55×83 inches dimensions into 30×34 inches.
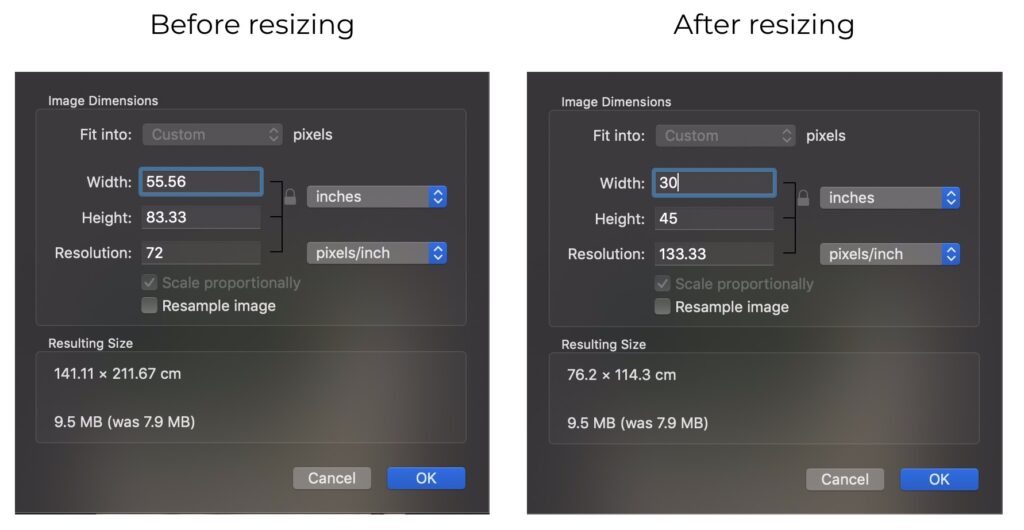
Let’s take a step back and understand what we just did: we’ve basically asked Preview to keep the same amount of pixels in the picture, while reducing its size by almost 50%. This means that the number of pixels per inch (PPI) will be increased since we have to squeeze the same amount of pixels in a smaller area. That’s why the resolution, which is defined by the PPI, increases from 72 pixels per inch to 133 pixels per inch after resizing the image.
When should you use resampling?
Resampling should be used if you’re trying to prepare images for the web or for print as you’ll fit your image’s number of pixels per inch (PPI) into specific PPI targets. For example, if your printer prints at 300 PPI, you could resize the image and check the “resample image” option until the PPI becomes 300.
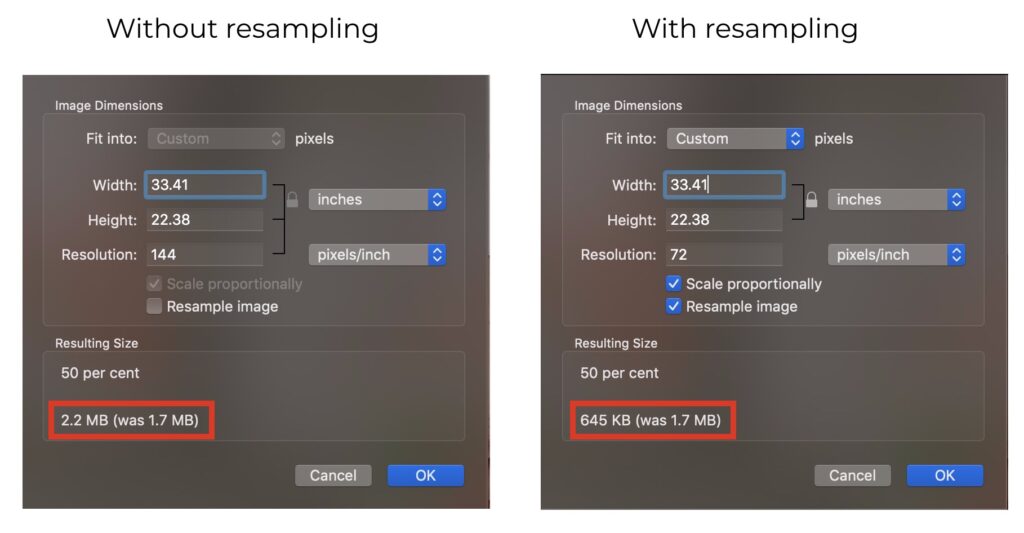
Another situation where you’d want to use resampling is if you’d like to reduce the size of the image file. If you leave the box unchecked, the file size of the image will not change. If you check the box, the size of the image file will be reduced upon reducing the size of the image, to reflect the decrease in the total number of pixels in the image. To demonstrate this, we tried reducing the size of an image by 50% in preview:
- Without resampling: the image size increased from 1.7MB to 2.2MB!
- With resampling: the image size decreased from 1.7MB to 645KB.
Keep in mind though, that resampling is irreversible. That means that once you’ve lost those pixels, you can not get them back!
How to resize images without losing quality on a Mac?
The Preview app makes it easy to resize images without losing quality. All you need to do is to uncheck the option “resample image” to prevent Preview to reduce the number of pixels per inch, which is likely to decrease the quality of the image. This way, Preview will preserve the number of pixels in your image when resizing it, and therefore its quality will remain the same.
Need to resize images for official documents like passports? Our guide on how to convert a picture to passport size has you covered.
2. How to Resize Images on a Mac With Pages?
If you use the Pages app as your text editor on MacOS, you’ll find that it comes with a handy way to resize images in any Pages document.
Here’s how it works. After opening the document that contains the images you’d like to resize in the Pages app:
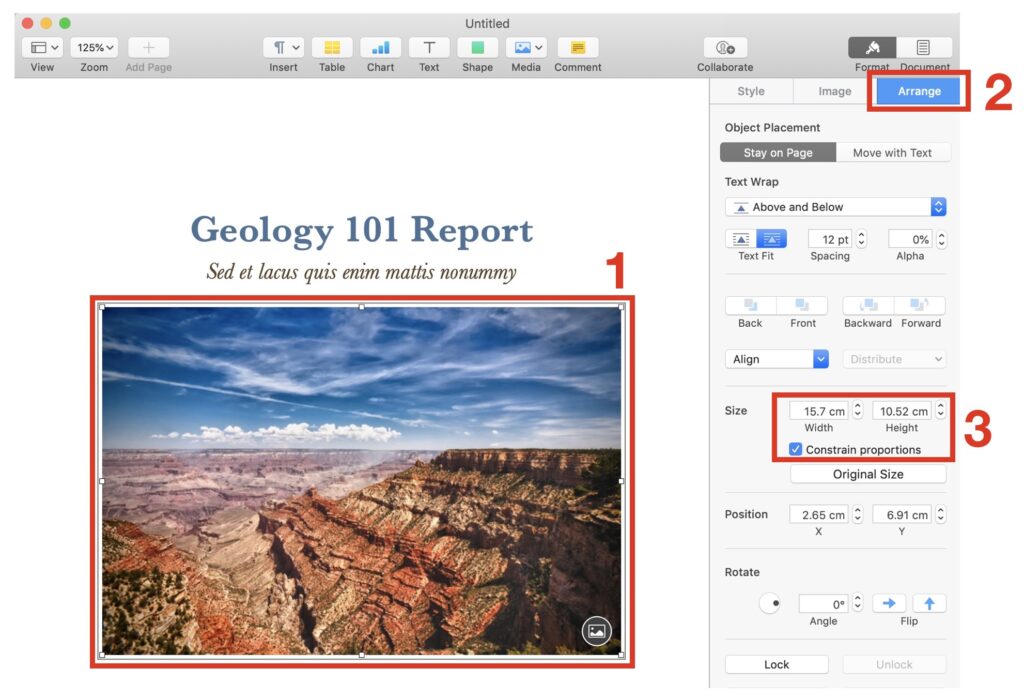
- Click on one image you’d like to resize
- In the right panel, click “Arrange” section
- Within the Size sub-section, enter new dimensions for your image ; make sure to check the box “Constrain proportions” in case you want to keep the image’s proportions. If you change the width and choose to constrain proportions, the height will automatically be adjusted to maintain the proportions.
After you’ve changed the values of the Width or the Height, your image’s dimensions will automatically be adjusted in the document.
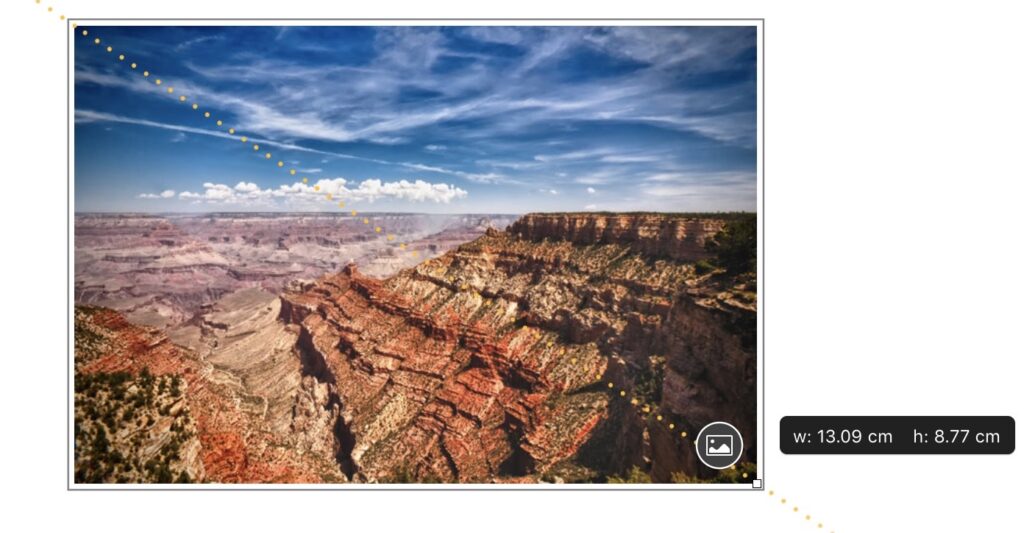
Note that a quicker way to adjust the size of an image, but with less precision, is to click on an edge of your image and drag it to increase or decrease its size.
Pros
|
Cons
|
3. How to Resize an Image on the Photos App on Mac?
We’ve previously seen how difficult it was for older iOS versions to resize photos in the Photos app on an iPhone. If you’re an Apple user, you know that resizing photos on an iPhone using the Photos app can be done by cropping it.
On Mac, you won’t need to crop the image. To quickly resize the image you’ll need to:
1. Open File > Export > Export 1 Photo in the menu bar
2. Click on the Size drop down menu
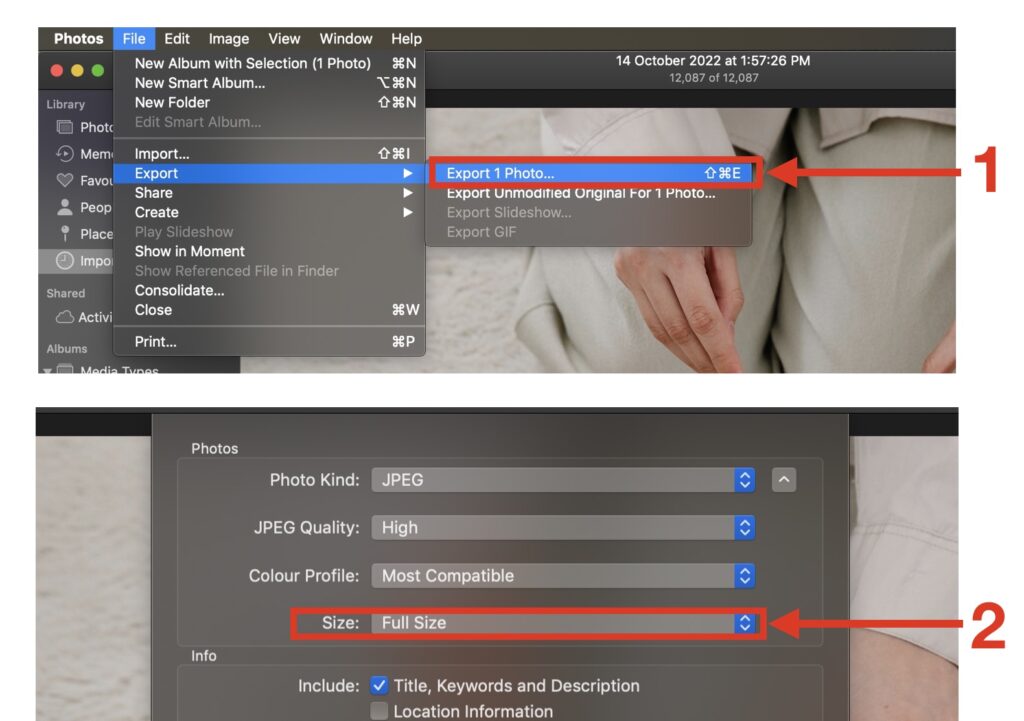
3. Choose a preset target custom size (Small, Medium, Large) or the “Custom” feature in order to resize your photo to specific dimensions.
4. Choose to resize the image according to Width, Height or Dimension. Choosing Dimension will limit both the Width and the Height to a specific pixel limit.
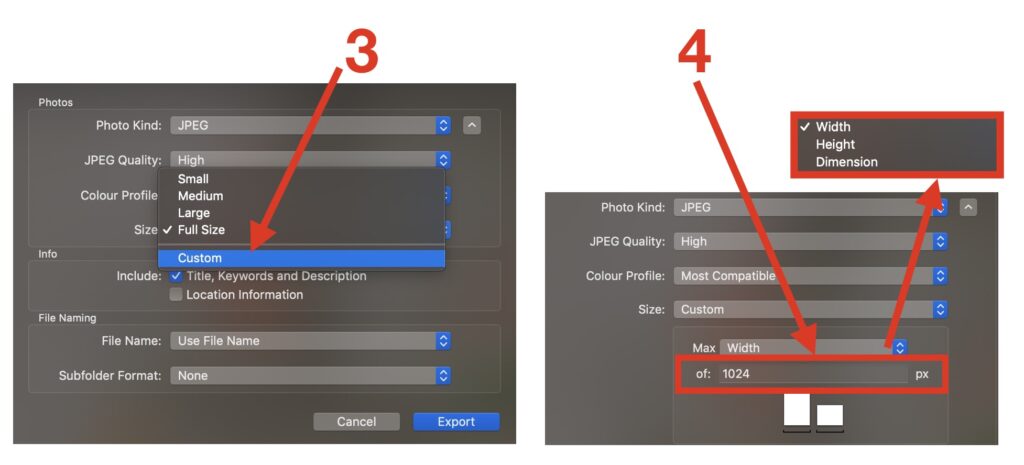
Note that the Photos app gives you good control about the output image: you can choose the type (JPEG, TIFF, PNG), the image quality (Low, Medium, High, Maximum) and the color profile such as aRGB or AdobeRGB. You can also add a title, specific keywords and a description to your photos.
Pros
|
Cons
|
4. Resize Images Using ColorSync Utility
According to Apple, the ColorSync Utility app on Mac allows you to create color profiles to make sure that the colors of your photos appear to be the same across all your devices and upon printing. But apart from this main purpose, the ColorSync app also allows you to change the size of images and gives you some control over the quality of the resized image. Let’s deep-dive into it.
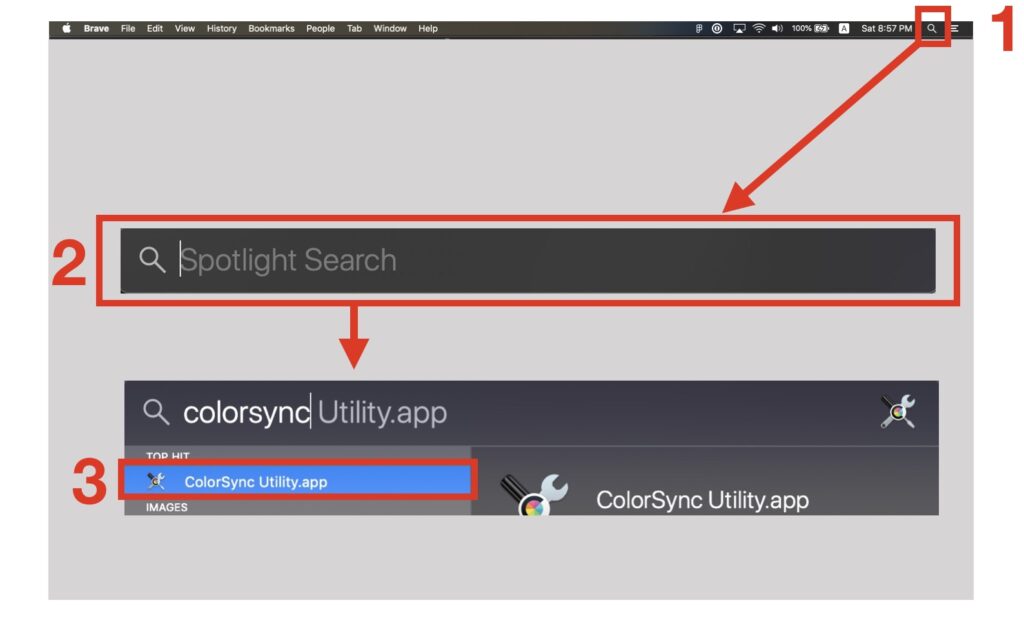
1. First, let’s open the ColorSync Utility app by searching for it in your Mac’s Finder. To do this, start by clicking on the magnifier at the top right of your screen.
2. Start typing ColorSync in the search field
3. Click on ColorSync Utility app
4. Click on File > Open… in the menu bar and find the photo you’d like to resize
5. Once you’ve open the photo, click on the resize icon

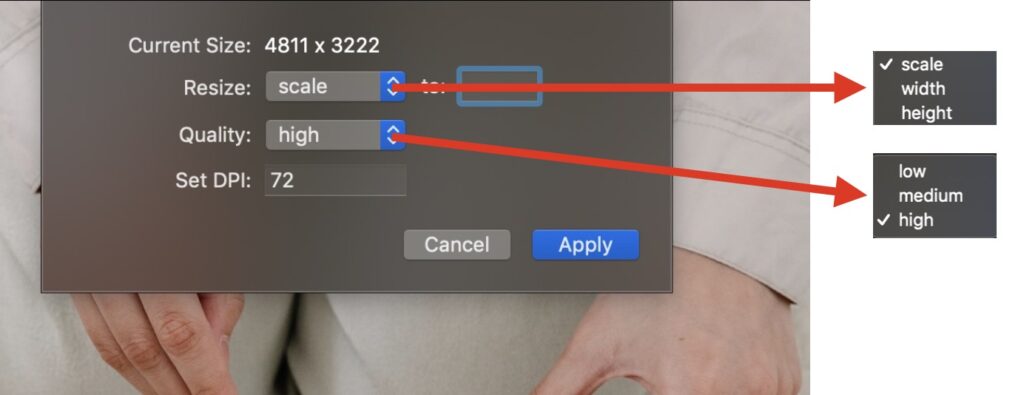
6. You’ll be presented with several options to change the size of your image. Resize gives you the ability to resize according to width, height and scale. Quality allows you to set the quality level to low, medium or high but unfortunately it doesn’t provide us with more details. Finally, the Set DPI allows you to define the resolution of the image. The value you’ll see corresponds to the number of pixels per inch on the original picture.
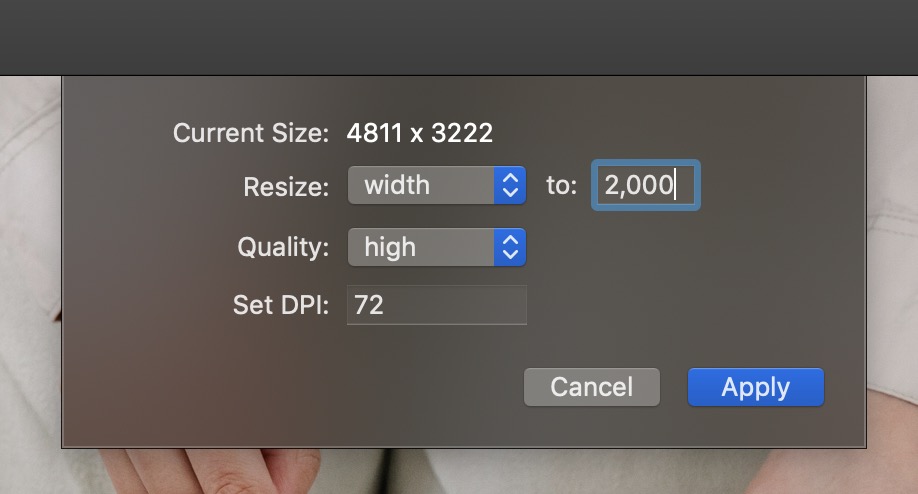
7. Let’s say you chose to resize according to Width. You’ll need to enter a value for the new Width (here we chose 2000px), a Quality level (we chose high) and the DPI value (we set the resolution to be the same as the original picture). Once you are done, click on “Apply” to resize the picture.
Pros
|
Cons
|
5. How to Change the Size of an Image Using the Mail App
Step-by-step method to reduce the size of your images in Mail on MacOs
If you’re trying to send a large image by email, you’d probably want to resize it to prevent your email to become oversized and be blocked by your recipient’s server or by your own mail server.
The method we’ll describe here works in all versions of Mac OS. Whenever you try sending an email that contains one or several images, the Mail app will give you the option to resize the image via a drop down menu. But contrary to the process of resizing an image on iPhone’s Mail app, the Mail app on MacOS will not proactively ask you to resize the image. You’ll need to keep it in mind.
1. Open the Mail app, start composing your message
2. Add images to your email by either:
-
- Clicking on the Attachment button in the toolbar
- Clicking the Photo browser button in the toolbar
- Going to the File > Attach Files… in the top menu
- Typing the shortcut Shift + Command + A on your Mac’s keyword
- Drag and dropping images from your Photos app into the Body of your email
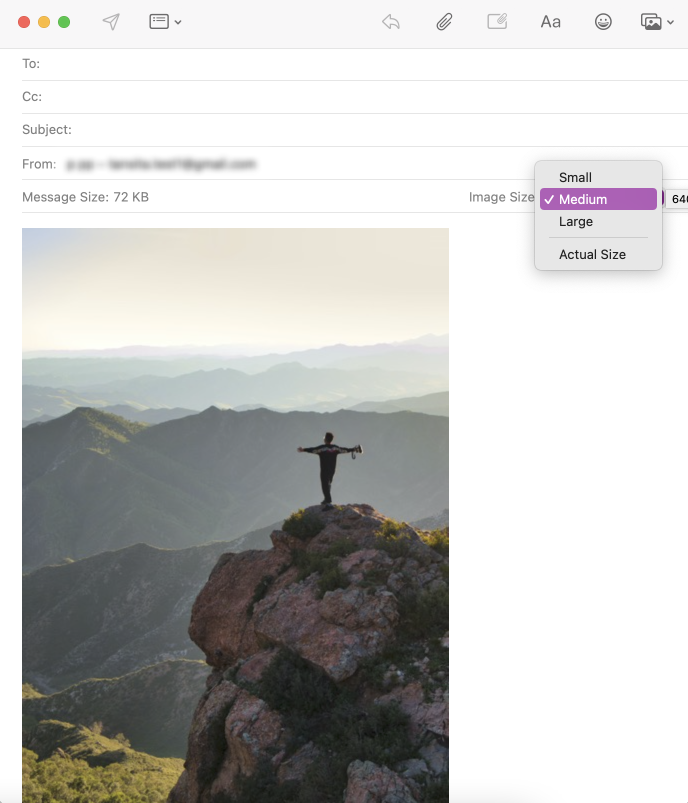
3. Click on the drop down menu next to “Image Size” on the right side of the message header; choose between Small, Medium, Large and Actual size. The latter won’t change your image size
4. Send your email
Pros
|
Cons
|
How to see the size of the message in the Mail app ?
MacOS’s Mail app conveniently displays the size of the email in the message header. If you’re trying to send one or several images and don’t have too much text in your email, this message size can give you a pretty good idea of how big your images are.
Importantly, the Mail, if your image is too big for the email to be sent by your email server, the message size will be in red color. If that’s the case, you’ll definitely have to reduce the size of that original image, or share them over a cloud storage service like WeTransfer or Google Drive.
Why is it important to resize images when sending an image via Gmail ?
If you’re using Gmail, you can not send emails larger than 25MB directly. So you’d need to first upload your image to Google Drive and share a link to that image on Google Drive within the body of your email. In reality, the maximum size of an image you can share via Gmail is even smaller than that because the process of encrypting your images and including them in your email relies on a protocol called MIME that increases the size of your email. This means that Gmail could force you to use Google Drive to send a photo even if the photo size is less than 25MB.
6. How to Resize an Image on Mac for Wallpaper?
Adding a wallpaper to your Mac can set you to the right mood or mindset. It can be used as a constant reminder of what matters to you, help you stay inspired or motivated to excel at your craft. So let’s see how to resize your images for that purpose. Here is how you do it:
1. Go to your Apple menu by clicking on the Apple icon at the top left of your screen, and Select System Preferences
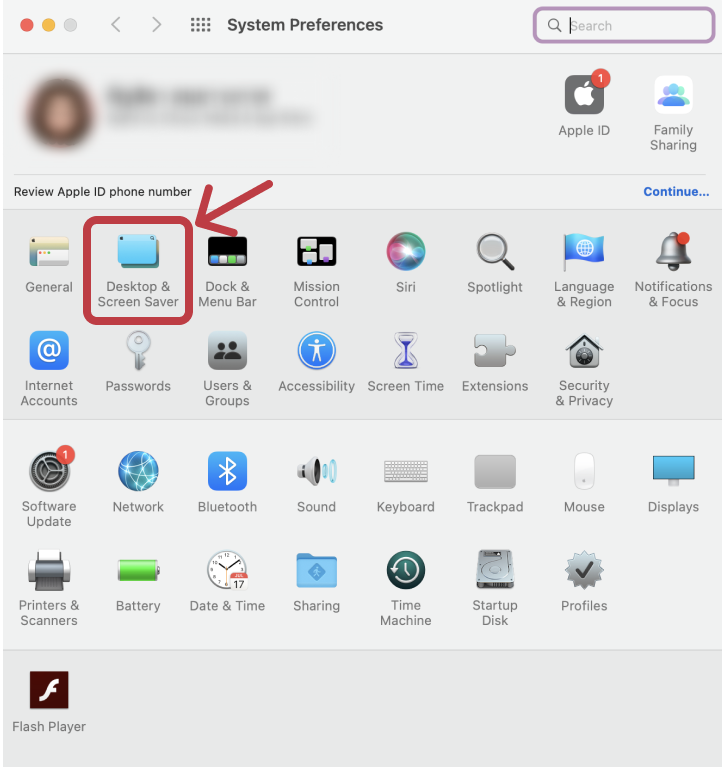
2. Click on the Desktop & Screen Saver icon
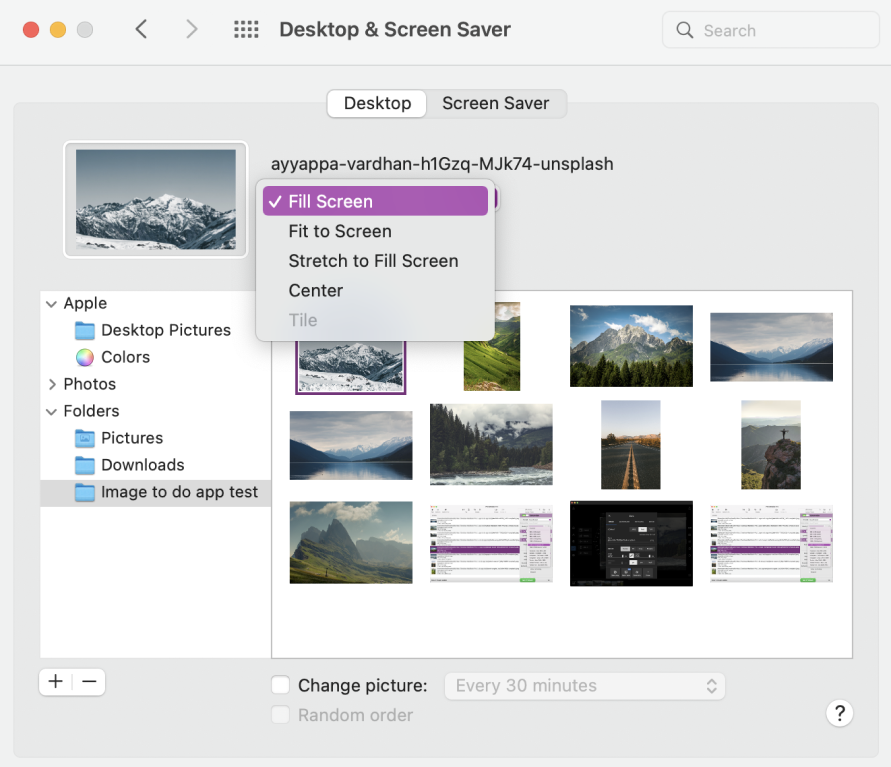
3. Select Desktop, and use the bottom left panel to find the folder that contains the image you’d like to use as your wallpaper
4. In the right panel, click on the thumbnail of the image you want to put as wallpaper
5. In the drop down menu that shows up above the thumbnails panel, select either:
-
- Fill screen: this will stretch your image to fit the entire screen
- Fit to screen: this will resize your image so that its width matches the width of your screen. This may cause your image to be zoomed in or cropped.
- Stretch to fill screen: this will stretch your image to fill the entire screen and it may lead to a distortion of your image if its width:length ratios are not the same as those of your screen
- Centre: this will center your image in the middle of your screen
Pros
|
Cons
|
7. How to Resize Images Using Quick Actions on Mac?
If you have to resize images on a frequent basis using the same specific settings, you’d save a lot of time by creating a Quick Action on Automator. If this is all Greek to you, don’t panic. We’re going to take it step by step, first by quickly explaining what Automator is, and then getting right into how you can use it to resize pictures much faster than with the Preview app. And yes, you can resize multiple images at once using Automator’s Quick Actions.
What is Automator?
Automator is an application that is pre-installed on your Mac. It helps you automate tasks. Think about any repetitive task that you constantly do, such as renaming files, changing an image format, resizing an image, or creating PDF from images, etc. Chances are, you can easily program it by selecting pre-built tasks and creating a custom workflow in Automator that replaces all the manual tasks you’d need to do. If you’ve read our blog post about resizing images on iOS, this will probably remind you of the Shortcuts app which you can use to resize an image without cropping it on iPhone.
If you’re using MacOS 12 Monterrey or later versions, the Shortcuts app comes pre-installed on your Mac and you access your Shortcuts from the the menu bar, spotlight, and in finder. It works pretty much in the same way as the Automator app, so you may use any of these mac apps to resize your images. However, Automator comes with more functionalities than Shortcuts but is somewhat less user-friendly than Shortcuts. If you prefer to use Shortcuts to use Automator, know that you may import your Automator Quick Actions into Shortcuts.
How to quickly resize images using Automator on Mac?
Now that you have a bit of background on the Automator app, go through the following steps to create a Quick Action on Automator. Steps 1-7 show you how to create an image resizing task on Automator. Step 8 shows you how to use it.
1. Open the Automator app. If you have no idea where it is, click on the magnifier at the top right corner of your screen and search for Automator.
2. Click on File > New in the menu bar and select Quick Actions.

Quick Actions is called “Services” on older versions of MacOS
3. Select “Image files” in the drop-down menu that follows “Workflow receives current”.
4. Select “Scale images” in the list of pre-built tasks on the left panel, then either double-click on it or drag-and-drop it to the right panel.

5. Upon doing so, you will be prompted to add an additional task to your workflow which allows you to keep a copy of your original picture. There’s no obligation to add that task, but if you don’t then the resized picture will replace the original one whenever you use the Quick Action to resize your picture.

6. Next, choose an image size (in pixels) that this Quick Action will resize your images to. The pixel dimension will be applied to the longest side of your image. If you prefer to use a Percentage for image resizing, choose that option in the drop down menu.

Choose the image size wisely as it will be applied to all the images that you’re going to resize using the Quick Action. For example if you’re trying to automate image resizing for your blog, make sure you know what size your blog post image should be.
7. Finally, go to the menu bar, click on File > Save and pick a name you can easily remember for this action. We chose “Resize to 480” as we set the task to resize photos to 480px

8. Congrats your automated task is now ready to be used! Let’s see how.
-
- Go back to the Finder, select one or several images and right click on them
- You can now view your Quick Action in the contextual menu and pick it in order to batch resize your images

Pros
|
Cons
|
8. Apps to Resize Photos Quickly on a Mac
What are the best free apps to resize photos on a Mac?
If you want more control over the resizing options, you’ll probably need to use a third-party app. We’ve reviewed the most popular ones.
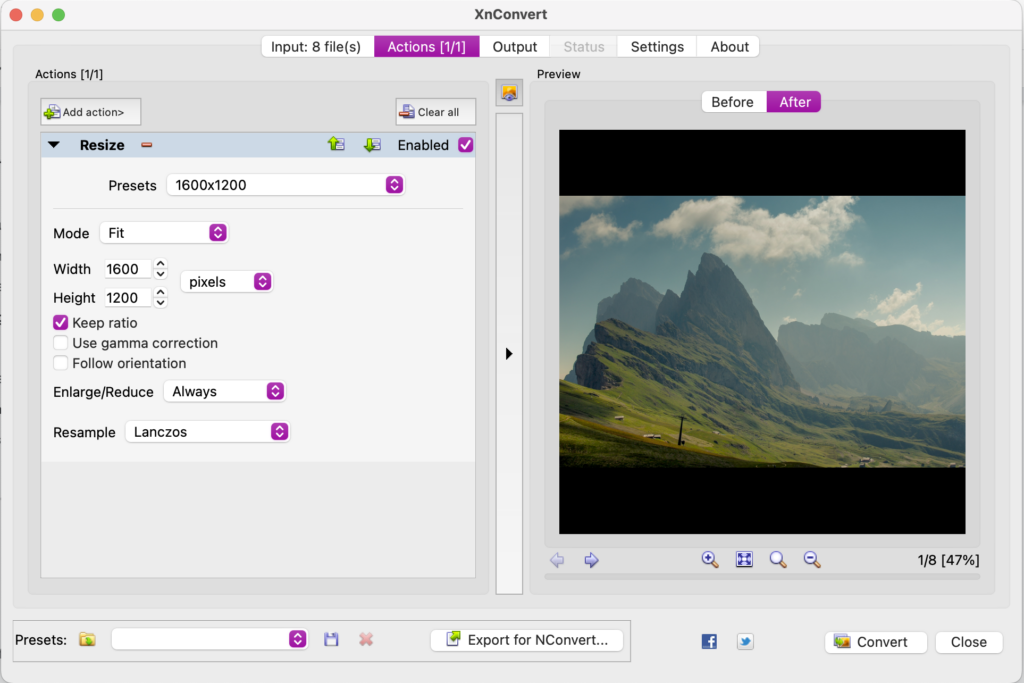
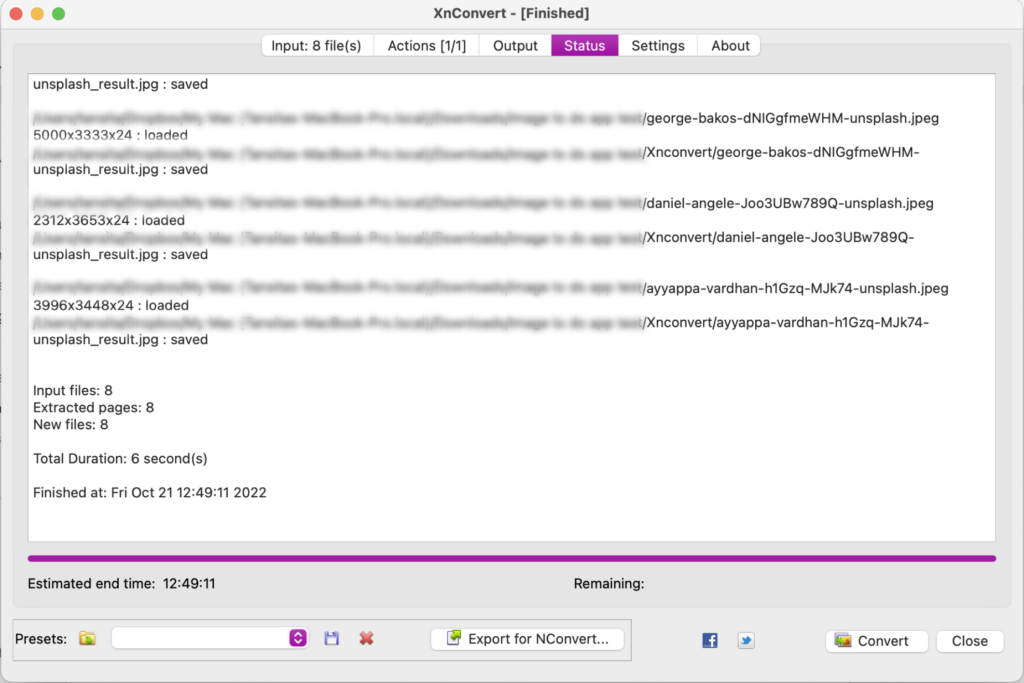
XnConvert
Built by a specialist in image apps, this app offers a lot of functionalities in the free version compared to similar apps and supports about 500 image formats. It comes with batch resizing, resolution settings and allows you to resize your photos to preset dimensions or to custom dimensions. What’s more, it comes with over 80 automated actions such as automatic cropping, resizing, metadata reset, watermarks and more.
Our overall rating: 5 / 5
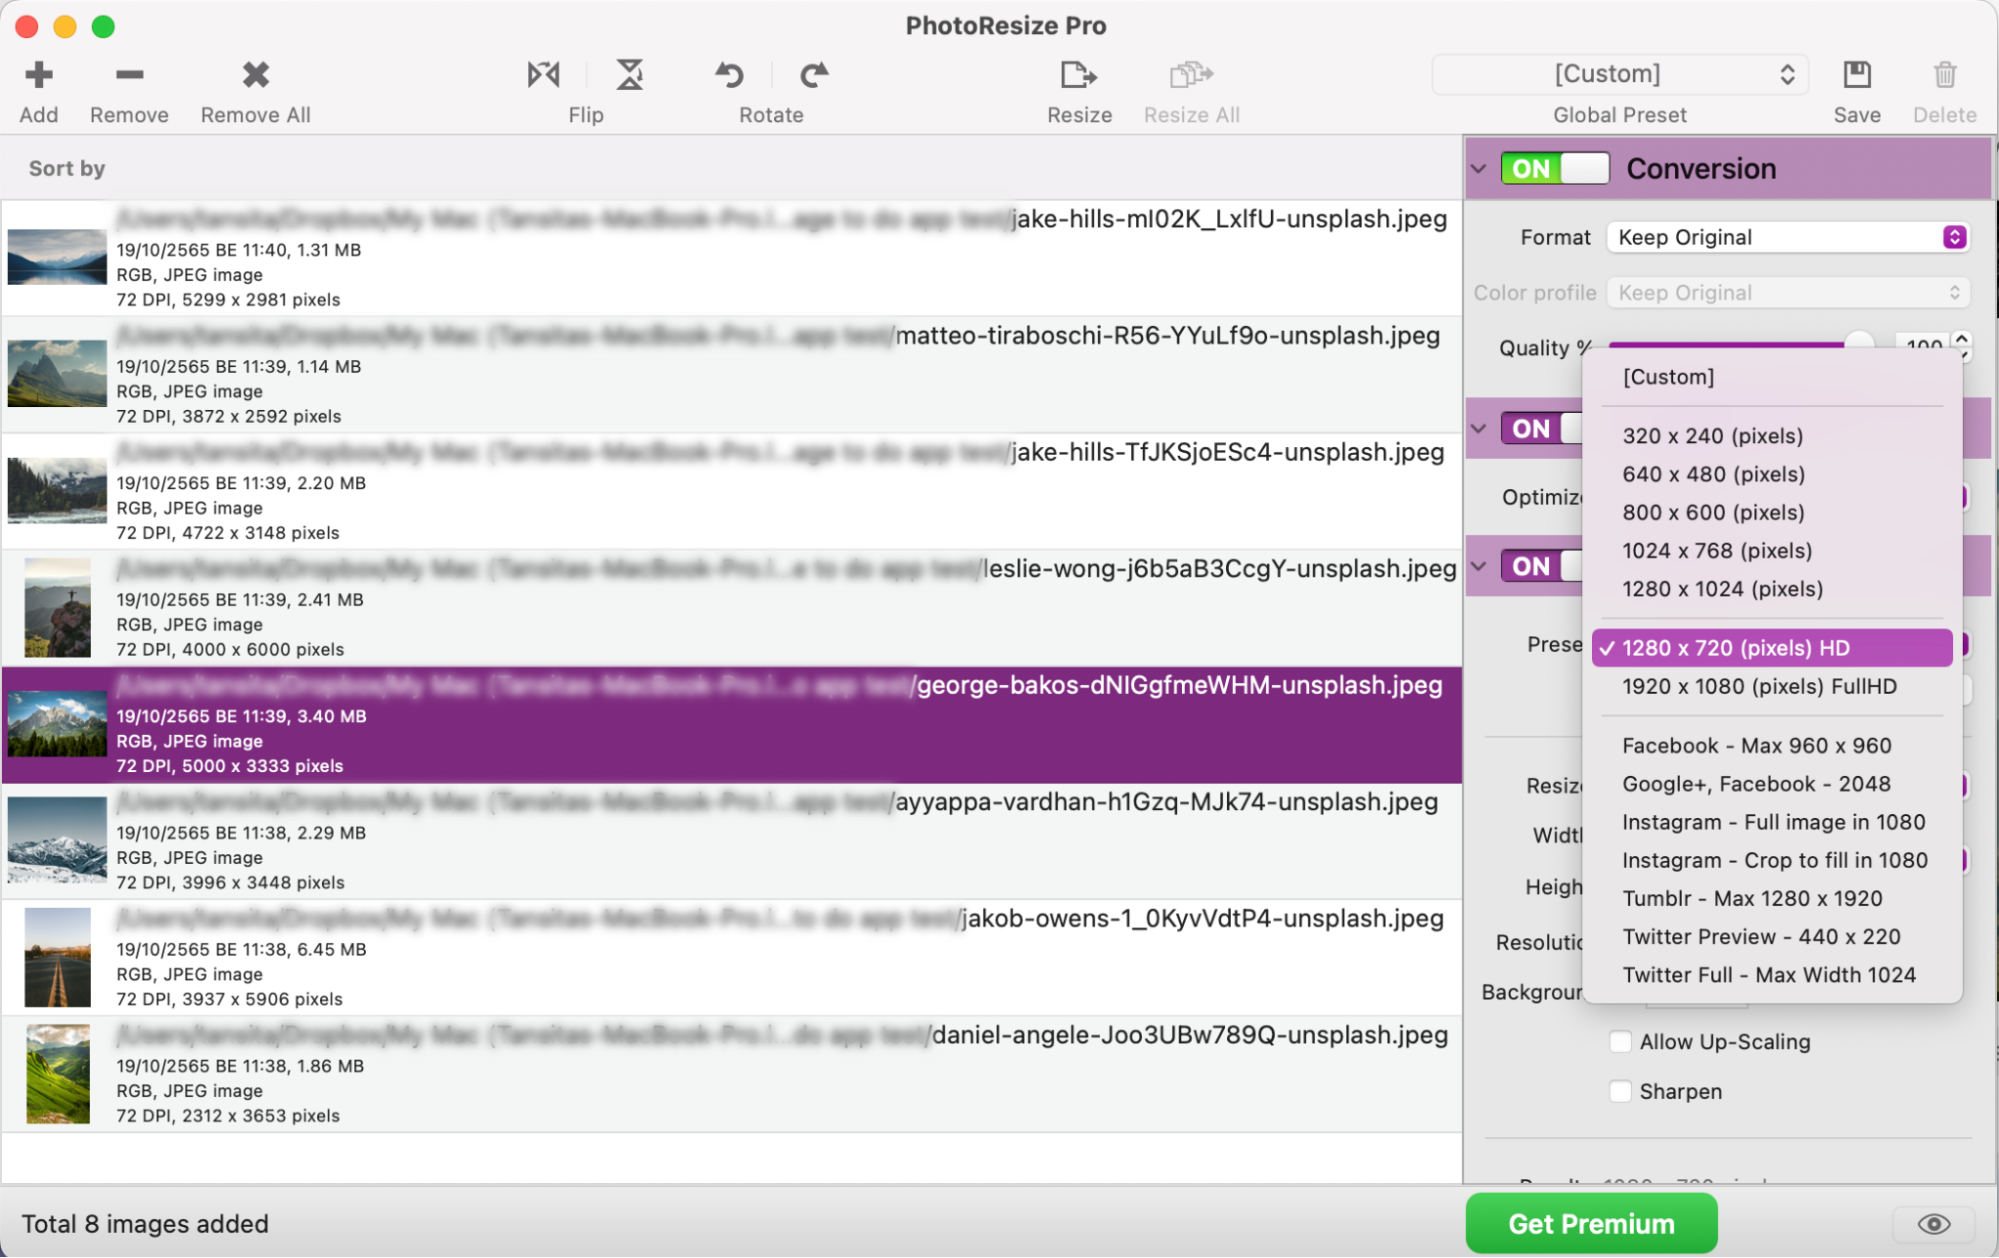
PhotoResize Pro
Boasting strong rettings, PhotoResize Pro app can be used for free and allow you convert images in any format (pdf, gif, heic, jpg, jp2, exr, png, tiff, tga, psd, webp and bmp). If you’re looking to quickly resize a photo, you may choose one of the popular resolutions such as 1024×768 pixels, 1280×720 pixels HD and 1920×1080 pixels HD. You also get to resize your to standard image sizes for social media platforms: Facebook, Instagram, Google+, Tumblr and Twitter.
Finally, this app allows you to easily convert images from jpg to png, in case you need transparent images or rely on text-heavy images, which png is better than jpg for, and vice-versa.
Current limitations:
- PhotoResize Pro app doesn’t give you the ability to set a resolution
- Batch resizing is only available in the paid version
Our overall rating: 4 / 5
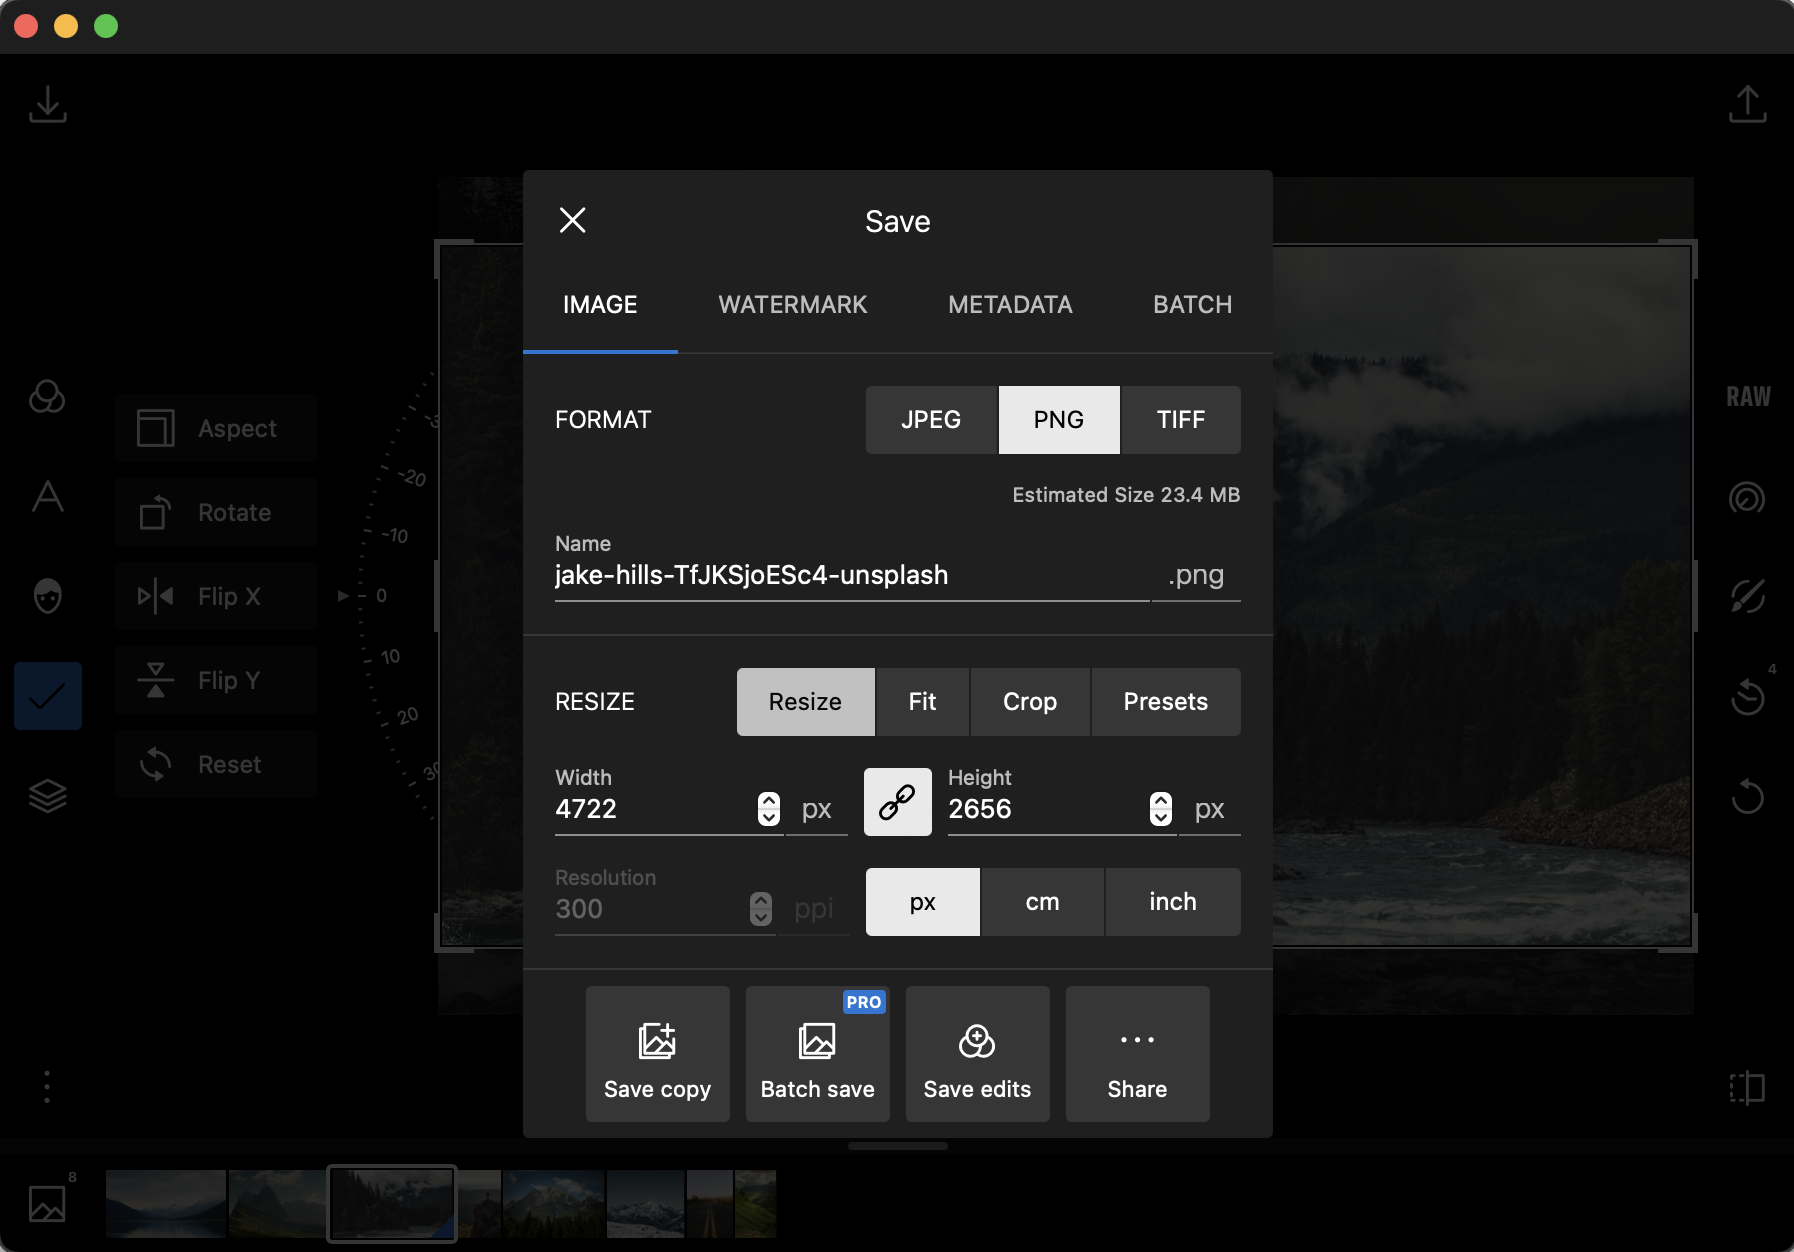
Polarr Pro Photo Editor
This app offers a lot of functionalities in its free version compared to similar apps. Apart from resizing photos in different preset or custom dimensions, and saving them in PNG, TIFF and JPEG formats, you can also change your resized image’s aspect ratio, flip it, apply sophisticated masks and choose among the 100+ free image adjustments offered by the app. In terms of quality, the resized image comes out pretty good and looks less pixelated than some other resizing apps.
Now on the cons side, similar to PhotoResize Pro, batch resizing is only available in the paid version.
Our overall rating: 4 / 5
Conclusion: Comparing the Various Ways to Resize Images on Mac
We’ve gone through several ways you can resize images on Mac. Here’s a quick summary of all of them so that you can use the one that serves your purpose the best.
| Method | Type | Ease of use | Features | Use for |
| Preview app | Free and built-in (no installation needed) |  |
 |
Quickly resizing one or several images without losing quality on Mac |
| Pages app | Free and built-in (no installation needed) | |
 |
Resizing images within a text document on Mac |
| Photos app | Free and built-in (no installation needed) | |
 |
Resizing photos while keeping control of the image format on Mac |
| ColorSync app | Free and built-in (no installation needed) | |
|
Resizing one image on Mac |
| Mail app | Free and built-in but requires that you’ve set up your Apple’s Mail app | |
|
Resizing one or several images to be sent by email on Mac |
| Desktop & Screen Saver | Free and built-in (no installation needed) | |
|
Resizing an image for wallpaper on Mac |
| Automator | Free and built-in (no installation needed) |  |
|
Handling repetitive image resizing tasks on Mac |
| MacOS Apps | Need to be downloaded and installed from the App store. Some features and apps are paid. | (average) |
|
Having more granular control over image resizing |