Are you having a hard time taking a high-resolution screenshot on your computer? Perhaps you have tried using different screenshot apps and are still ending up with mediocre results. No matter how many images you put in your article, if the quality isn’t there, the overall result will be a bad experience for your reader.
Well, you’re not alone. We’ve had to deal with this challenge, as we like to incorporate screenshots in the articles we publish here. In the process, we have uncovered tips and tricks that will help you take better screenshots. Let’s get started.
Why Is My Screenshot Quality Bad?
The first thing to understand is how screenshots work.
When you take a screenshot with an app or print screen command, you’re just accessing the framebuffer and copying the current bitmap of the video display.
So, what is a framebuffer?
It’s the portion of the RAM that holds the information about what is currently displayed on the screen. A bitmap is just a map of bits. The bits contain details on the location of pixels and color information.
Summing it all up, taking a screenshot just involves grabbing the bitmap, which is essentially a map of pixels on the screen.
Every time you see a picture on a computer screen, your computer reads information from the image file. In its raw format, the image file is a series of 0’s and 1’s. And these digital values tell the monitor how to reproduce each pixel to build a complete image.
Now, your screenshots can have bad quality because of various reasons, including:
1. The pixel density of the screen – Pixel Per Inch (PPI)
The number of pixels per square inch of your screen may have a role to play in the quality of your screenshots. In other words, the more pixels per square inch (PPI) on your screen, the higher the resolution of your screenshots.
Note that: Pixels per inch (PPI) is sometimes referred to as Dots Per Inch (dpi). But the correct usage of DPI is when specifying the number of dots the printer should make per inch.
It’s tricky to explain the difference between pixel density and resolution without using a lot of jargon. But here is an example to make it easier.
If a 24-inch monitor has a resolution of 1920 x 1080, it means that it has 1920*1080 = 2,073,600 pixels. It roughly has a 92 PPI.
Some 6-inch mobile screens have a resolution of 1920 by 1080. They do have the same amount of pixels as the corresponding 24-inch monitor, but the pixels are denser. In this case, the 6-inch screens will have a 320 PPI.
Having a higher PPI makes images sharper and more refined.
If your computer had a higher resolution, it would certainly have more information in its framebuffer. Therefore, the images may be sharper.
Consequently, taking a screen grab on a computer with better and finer details means that the screenshot will be better than a less refined monitor.
2. Your screenshot app
Your screenshot application may be to blame for the poor image quality of your screenshots. The problem may come from how the app saves the image or performs the screengrab.
3. Image file formats, PNG vs JPEG
The file format used when saving screenshots can also affect the image quality. Two of the most popular formats are JPG (lossy format) or JPEG, and PNG (lossless format). Your screenshots will look better if you save them with PNG, but the file size will be considerably larger compared to saving them with JPEG. For more details, check out our article about PNG vs JPEG, or learn how to convert a file from PNG to JPG format.
4. Scaling or enlarging the screenshots
Your screenshots should be captured in the same size you intend to use. That means on a 1:1 ratio. So if you capture a screenshot at 600:400px, but you need to enlarge it to 800:600 px, there will be a noticeable degradation in the quality. That’s because you’ll be essentially trying to stretch the pixels.
Now that you understand where the problem of bad screenshot quality is likely coming from, let’s find some solutions! We’ll look at ways to get high quality screenshots:
- using your Browser (Chrome or Firefox)
- on Desktop (Windows and Mac)
- on Mobile (Android and iOS)
- using a mobile app
Let’s go ahead!
Why Are High-Quality Screenshots Important?
High-quality screenshots are not just about aesthetics; they can significantly impact the usability and functionality of the captured information:
- Improve readability: Clear, crisp screenshots make it easier for viewers to read text and discern small details.
- Professional appearance: High-resolution screenshots contribute to a more polished and professional look, which is important for business presentations, tutorials, and documentation.
- Data extraction and conversion: Clear screenshots can be essential when converting image data to editable formats. For example, when converting a picture to Excel. The higher the quality, the more accurate the conversion process will be, reducing the need for manual corrections.
- Future-proofing: As display technologies continue to improve, high-resolution screenshots will remain usable and clear on newer devices with higher pixel densities.
How to Take a High-Quality Screenshot of Websites With Google Chrome or Firefox
If you take a lot of screenshots of websites, you may notice that the images may appear fine, but the text will be somewhat blurry. To solve this issue, there is no need to get a computer or graphics card with a higher native resolution. Instead, you can use emulated devices. How does this work?
Google Chrome and Firefox, two of the most popular web browsers, allow you to emulate devices of any size and resolution and take screenshots of them. For instance, when we take screenshots for this blog, we emulate a laptop screen with a high-density PPI. Let’ see how it works on each browser.
Using emulated devices on Google Chrome
There are two ways to access the emulated devices on Google Chrome browser.
Either:
- Navigate to the website where you want to take the screenshot.
- If you’re on a Windows device: use the shortcut Ctrl + Shift + I.
- If you’re on On Mac: use Option + ⌘ + J on Mac to access Developer tools., or go to View > Developer > Javascript Console.
Or
- Click on the Chrome menu icon (Look for the three stacked dots next to the address bar)
- Select More Tools > Developer tools

- Chrome allows you to create a custom emulated device, and you can even emulate a 4K screen. Using that emulator, you’ll be able to significantly improve the quality of your screenshots. Now let’s see how to create one.
- Click the dropdown arrow and select Edit.

Choose Add custom device to set it up.

- Name your device.
- The first input parameter is the width, followed by the height. For example, we chose to emulate the screenshot quality of a 1920 x 1080 monitor. For the device pixel ratio, enter 1 for a normal resolution or 2 to replicate a retina display.
- Click on Add, in order to save the new emulated device.

You’re now ready to take a high-resolution screenshot:
- Ensure that you have your custom emulated device selected.
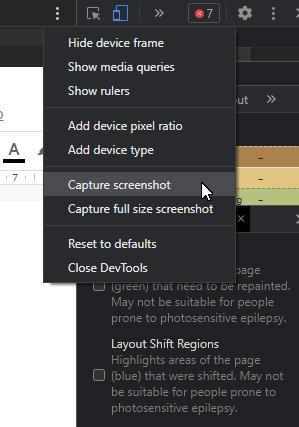
- Click the three stacked dots on the resolution settings panel
- Select “Capture screenshot”
Alternatively:
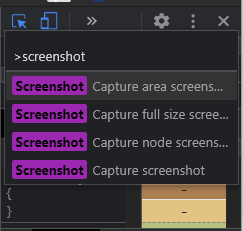
- Open the Developer Tools panel in Chrome through the menu : View > Developer > Developer Tools
- Press Ctrl-Shift-P on Windows or Cmd-Shift-P on Mac
- Type “screenshot” to access a list of available commands
- Choose from the four options and press enter
Using emulated devices on Firefox
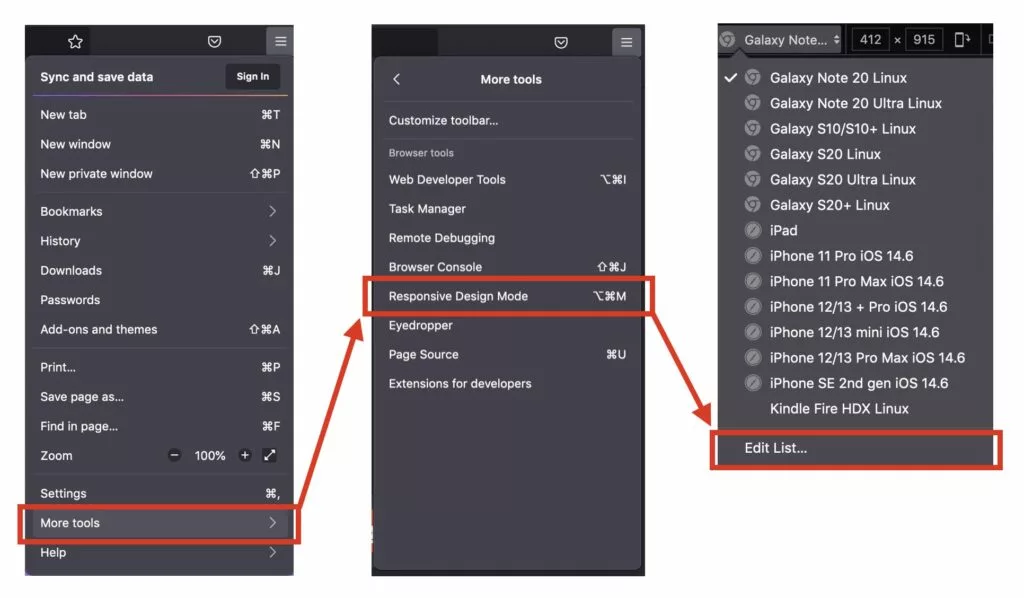
Firefox also allows you to use emulated devices. Go to the Applications Menu > More tools > Responsive Design Mode. You may also use one of the two following shortcuts:
- on Mac: Cmd + Opt + M
- on Windows: Ctrl + Shift + M
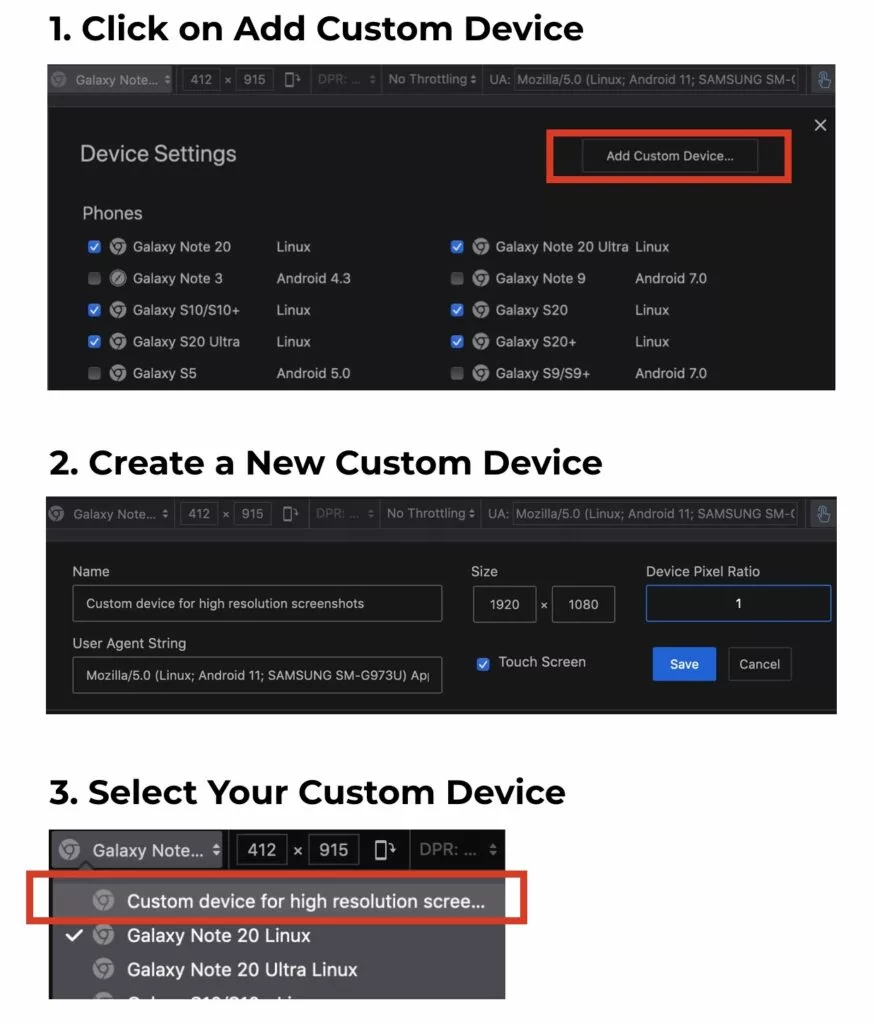
- Create a new custom device
- Enter the size and device pixel ratio; here we chose, respectively, 1920 x 1080 and 1, which corresponds to
- Click on the ‘Save’ button
- Select the new device when creating new screenshots
You can expect a remarkable improvement in quality with this method compared to using your native resolution. The only limitation is that you cannot capture anything that is outside the emulated screen. For that, you’ll need to learn how to capture high-quality screenshots on different devices. This is what we’ll look into next.
How to Take a High-Quality Screenshot on Windows?
While you’re limited by your hardware and system components, you can still manage to take high-quality screenshots on Windows.
You will not need any complicated software. Just use the print screen command:
- When you’re ready to take the screenshot, press the PrtScn button from your keyboard
- Open Paint.exe
- Paste the image (Ctrl + P)
- Crop the image to remove menus and other items
This is the old-school way of doing things. But Windows has a snipping tool that can make this process a little bit faster. Previously the app went by the name “Snipping Tool,” but it has been updated to Snip and Sketch.
If you’re on Windows 10 or Windows 11, just type “Snip & Sketch” to launch the program interface.
Windows also has several settings that could be standing in the way of achieving a high quality screenshot. You need to ensure that:
- You’re using the recommended screen resolution;
- You have enabled Windows to adjust apps to ensure they are clear.
For the screen resolution, go to Display Settings > Display Resolution. Choose the recommended native resolution.
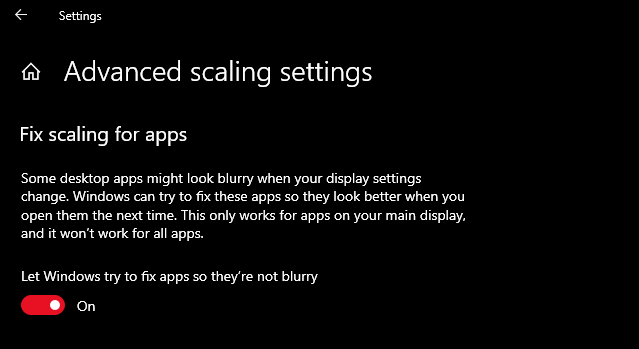
Ensure that Windows can fix apps so that they are not blurry by going to Display Settings > Advanced Scaling Settings > and toggle on “Let Windows try to fix Apps….”
There is no disputing the convenience offered by various screenshotting apps. Many allow you to upload screenshots to the cloud and share links rather than attaching the image in the message. But by default, the app may be compressing the screenshots, so check if this is not the case.
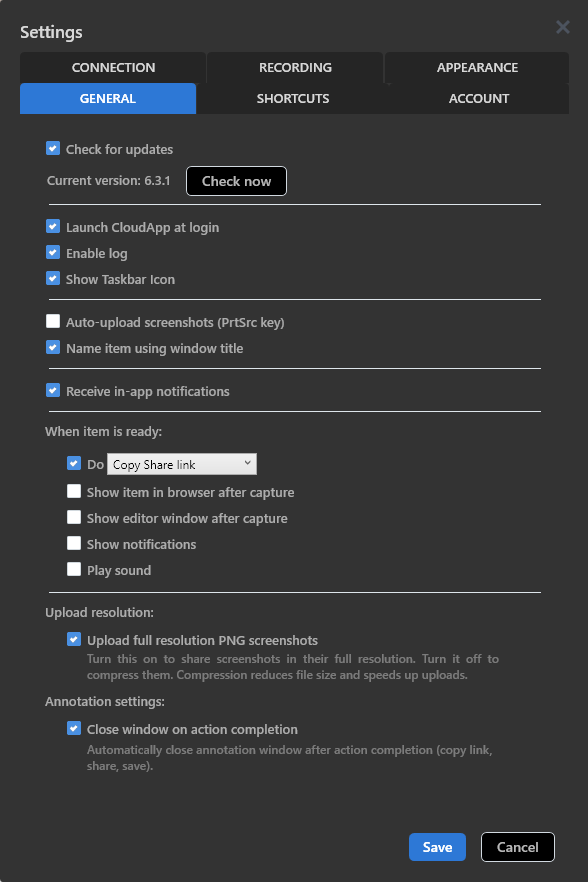
For instance, CloudApp has a setting that allows you to Upload Full Resolution PNG screenshots. But it’s usually off.
How to Take a High-Quality Screenshot on a Mac?
Mac users tend to experience fewer problems getting high-quality screenshots. In fact, the last complaint we found about blurry screenshots on the Apple discussions forum was on November 17th, 2005. But if you’re experiencing any issues, you can:
- Use the built-in screenshot app on Mac (cmd+shift+4 or cmd+shift+3). Compare if the screenshots are better than from a third-party app.
- Capture individual windows to avoid imperfect cropping around rounded corners. Just hold Cmd + Shift + 4 simultaneously. Then press the spacebar. The cursor should turn into a camera icon, and it will allow you to capture individual windows.
- Ensure that the images are saved in PNG. By default, screenshots are in PNG, but if someone had the computer before you, they might have changed the setting. Launch the terminal and enter the following command:
defaults write com.apple.screencapture type (PNG )
(Press enter)
killall SystemUIServer
You can also try other file formats, including BMP, pdf, jpg, jp2, tif, pict, and tag.
- Use third-party screenshots apps for Mac: You can try various apps for Mac, including Xnapper, CleanShot X, and Snagit, which provides scrolling capture.
How to Take a High-Quality Screenshot on an Android Phone?
While you cannot increase the number of pixels on your screen, various apps will allow you to get higher-quality screenshots on Android. One of the proven apps is Screenshot Capture. In reviews, many people have noted that the app helped them improve the quality of their screenshots. It also comes with a floating bubble allowing you to launch the app easily.
Your phone may have the resolution to take good screenshots. But they may become blurry after sending them using apps such as WhatsApp. Messaging apps compress images to save on file size. One trick to avoid this is sending the images through email or Bluetooth.
Make sure you also screenshot from a high quality image. If the original material is not of good quality, the end result will have issues as well.
How to Take High-Quality Screenshots on an iPhone?
There have been recent complaints by iPhone users of blurry screenshots. However, the problem has not revolved around the screenshots themselves. iPhone devices have high-resolution screens. Many people complain about blurriness when sending screenshots to other people.
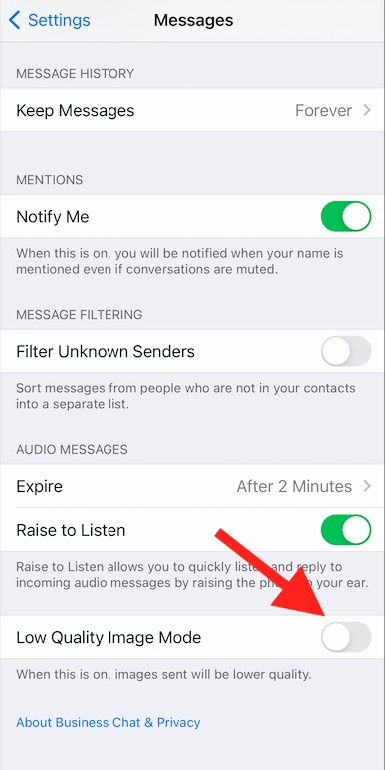
The first thing to check is if the low-quality image mode is turned on. Go to Settings > Messages > And toggle off Low-Quality Image Mode.
The screenshot may be blurry if you’re also sending it on other messaging apps such as Facebook. You can consider compressing the image beforehand with third-party apps or websites. One app that can help is the Screenshot App. It claims to reduce the size by up to 30 times without any noticeable change in quality. However, it doesn’t have the best ratings.
What Is the Best Free App for Taking High-Quality Screenshots Online?
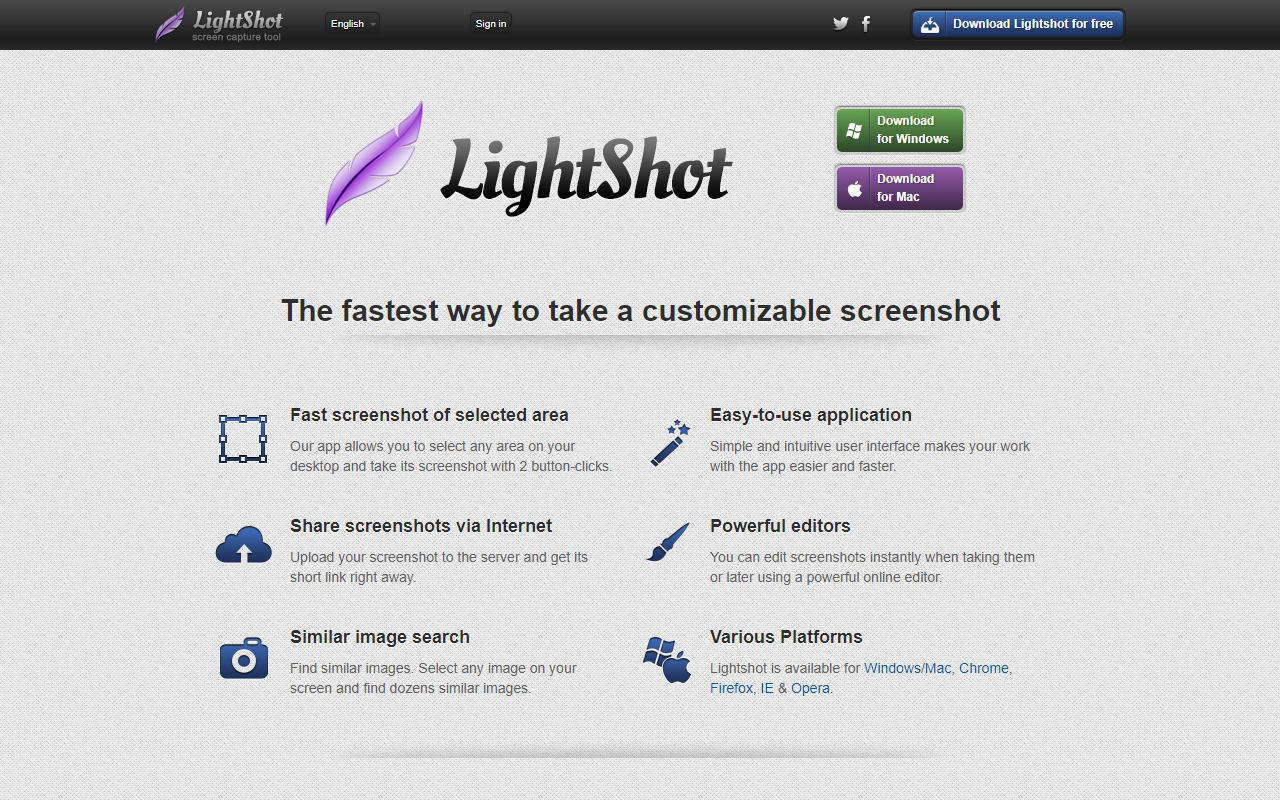
This is not an endorsement, but if you’re looking for one of the best apps for taking high-quality screenshots on Windows or Mac, you can consider downloading LightShot. It reproduces images with the same accuracy as the built-in screenshot functions. The best part of it: it’s a free! However, there’s a catch that may scare some of you: on LightShot, your screenshots can be seen by everyone. That’s why we recommend to use a privacy-friendly screenshot app in our next paragraph.
Frequently Asked Questions
Is it safe to use an online tool to do screenshots?
As we mentioned in a previous paragraph, one of the big drawbacks of LightShot, the popular free screenshot app, is that your screenshots won’t be private. In fact, LightShot’s terms of service are very clear about it: “No image uploaded to this website is ever completely hidden from public view. ” That’s why LightShot is a treasure trove for hackers who use all sorts of scraping techniques to exploit screenshots. You should only use LightShot for screenshots that don’t contain any private information. This is the same principle you need to follow if you want to convert iPhone photos to PDF online for free.
If you are looking for a privacy-friendly LightShot alternative and don’t mind paying for it, check out Snagit.
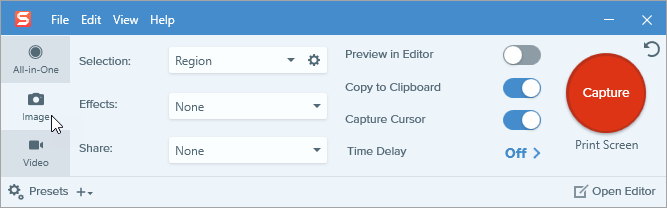
Snagit is often seen as the ultimate screen capture tool and offers a lot more functionalities than LightShot such as video captures, team collaboration, sensitive data blurring, iOS screen captures, ability to record a voice-over, and more. While Snagit offers a free trial, you’ll have to pay to get access to those features.
How to reduce the size of your screenshots?
While high-quality images are great, they will definitely increase the file size and can slow down the load time of websites. So before uploading your high-quality screenshots, run them through an image compression app but make sure that it does not reduce the image quality. One of the best image compression algorithms is offered on Tiny PNG.
It’s also possible to use image-editing programs such as Adobe Photoshop to increase the image’s sharpness. You can find out more about using its sharpening features here.
Finally, in case you’re an Apple fan, we’ve covered how to resize your photos on an iPhone, and how to reduce photo size on Mac. The methods we’ve described also work if you want to reduce the size of screenshots taken on your phone.